JavaScript Introduction
An introduction to JavaScript.
1. async and defer - attributes to control the loading behavior of JavaScript
-
With async the download of the JavaScript file takes place asynchronously, so that the processing of the HTML code is not paused. This executes the JavaScript code directly once it is downloaded. Suitable only for scripts that work independently of the HTML document.
<script src="script.js" async></script>
-
With defer the JavaScript code is not executed until the HTML code has been completely processed.
<script src="script.js" defer></script>
If neither async and defer is present: The script is downloaded and executed immediately, blocking parsing until the script is completed.
-
If the user has JavaScript disabled, or the web browser does not support JavaScript, a special hint can be given to the user with <noscript>...</noscript>.
Complete Code - Examples/Part_1/...
 <script src="js/hello.js" defer></script>
 <noscript>
     JavaScript is not available or it is disabled. <br />
     For optimal use of this website it is recommended to
     to use a browser like JavaScript or enable JavaScript
     in your browser.
 </noscript>
2. Output from JavaScript
2.1. Standard dialogs
-
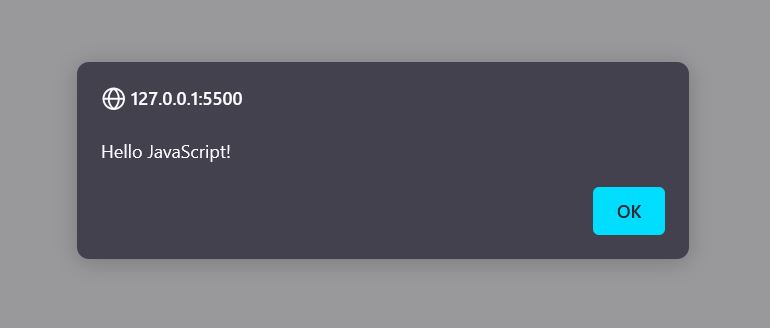
alert(), the function outputs the text passed between the brackets in a hint dialog.
Complete Code - Examples/Part_1/...
 function showHallo() {
     alert('Hello JavaScript!');
 }

 showHallo();
-
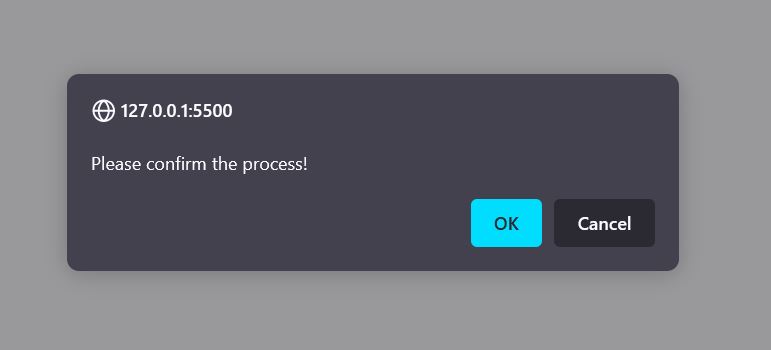
confirm(), is the classic OK cancel dialog with two buttons.
-
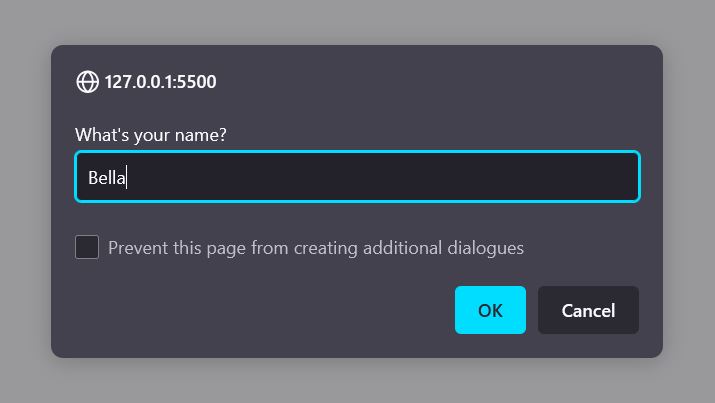
prompt(), is the dialog for entering text.
Complete Code - Examples/Part_2/...
function showConfirm() {
confirm('Please confirm the process!');
}
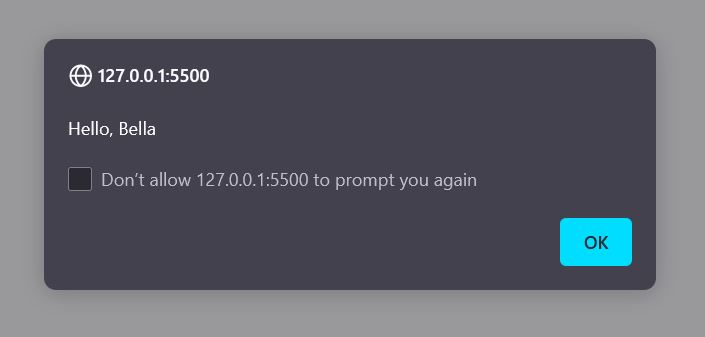
function showPrompt() {
var result_text = prompt("What's your name?", "");
if (result_text == "" || result_text == null)
history.back();
else
alert("Hello, " + result_text);
}
showConfirm();
showPrompt();
confirm()
prompt()
These standard dialogs are rarely used in practice, it depends on the layout and because the application possibilities are very limited. Moreover, the web browser may ignore them if they are displayed repeatedly.
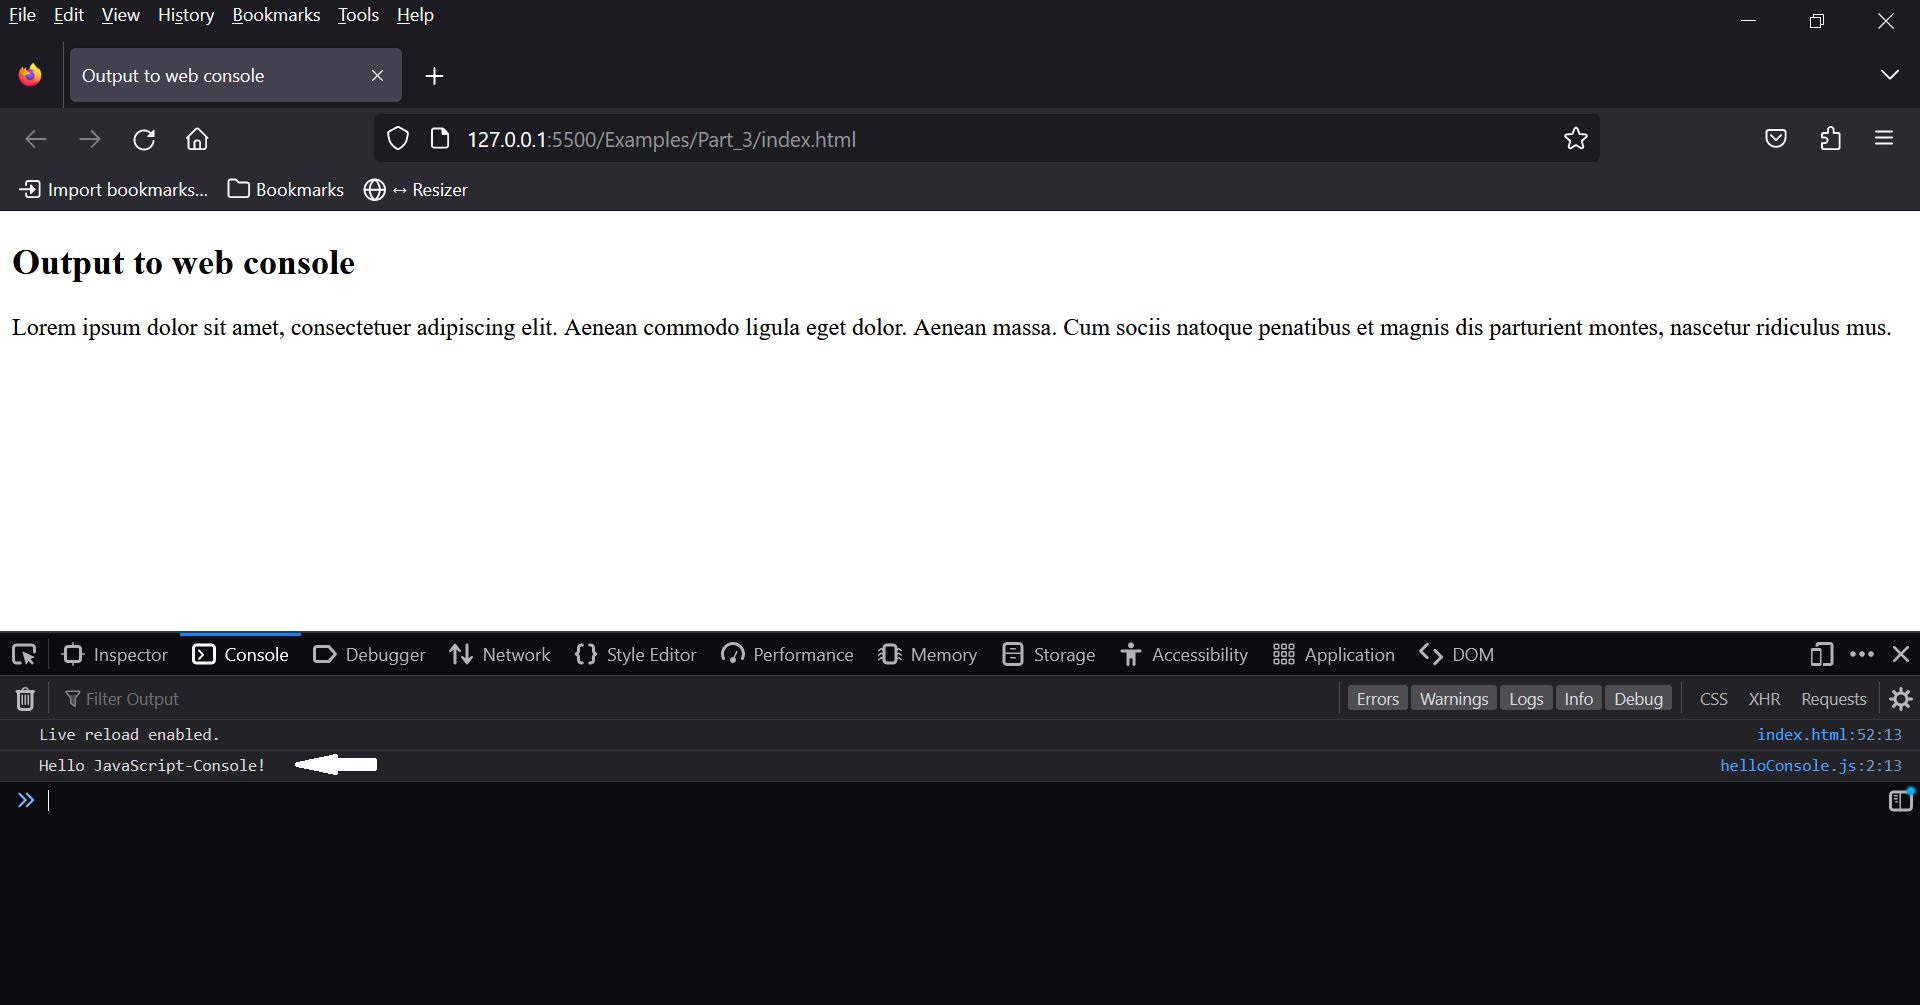
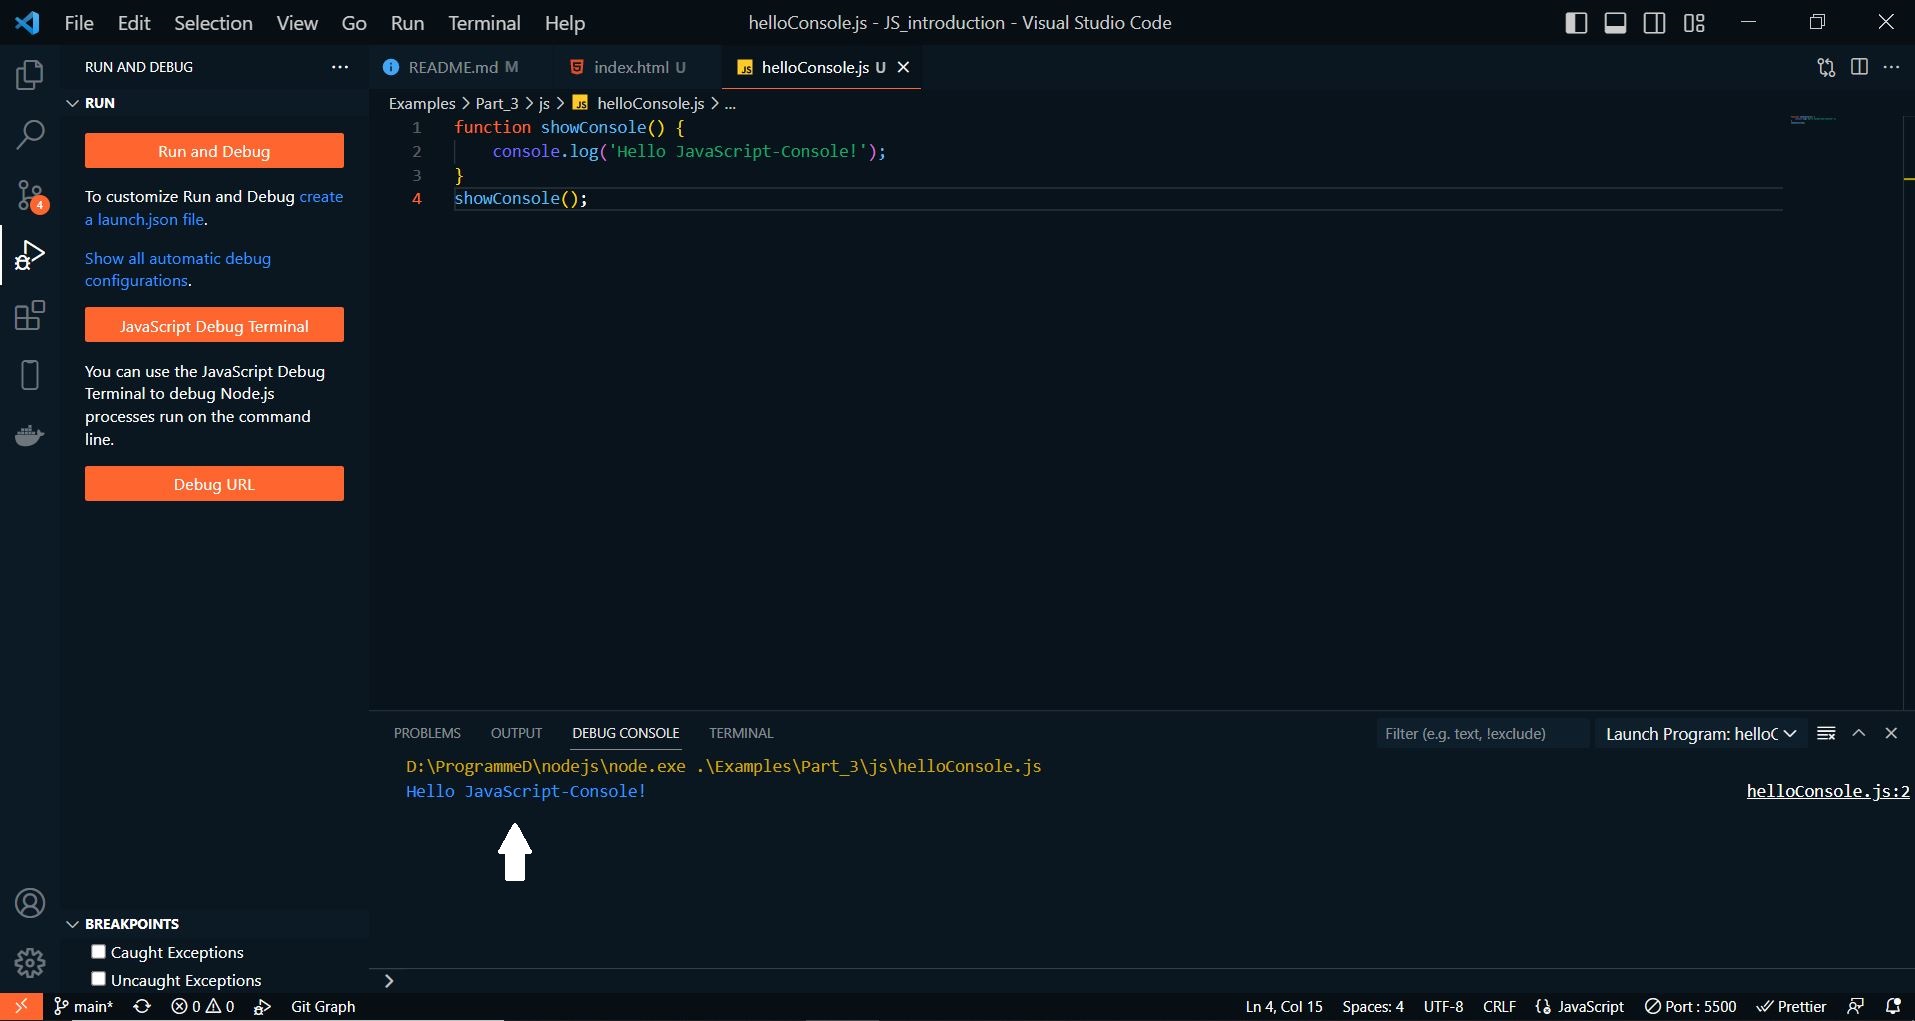
2.2. Output to the console
With log(), a method of the console object, a simple console output can be generated. However, such a log output in the console is not intended for the user, but for the developer, in order to trace the sequence of individual program sections or to find errors.
Complete Code - Examples/Part_3/...
 function showConsole() {
     console.log('Hello JavaScript-Console!');
 }
 showConsole();
in the web browser:
Besides console.log there are other categories of output:
 console.log('A log message');
 console.warn('A warning message');
 console.info('An information');
 console.error('An error message');
All functions can be used like console.log, only the output in the web console usually changes style.
It is also possible to start the JavaScript code directly from the runtime environment, but for this Node.js must be installed on the computer. After installing it you can start the code with node (in Visual Studio Code: Run - Start Debugging - select "node.js").
However, the output via the console object should only be used during development. Even if the visitors usually do not see this output, the output to the console should no longer be used in the finished website. Some web developers therefore use special logging libraries, with which one can switch the logging information on or off at any time with appropriate configuration.
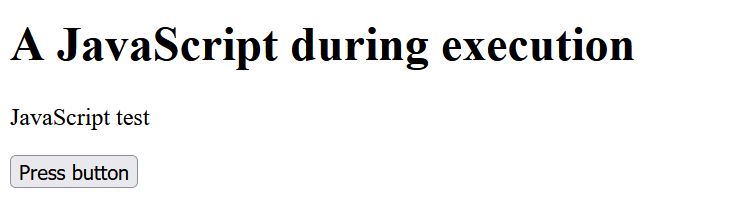
2.3. Output to the website
The output with standard dialogs is not very nice and the output via console.log is only for developers. So for the user of the website a different output has to be created. That's where the HTML elements and attributes come into play, so a classic input/output can be done directly in a text field up to a DOM manipulation to create an output (where the web page or parts of it are changed dynamically at runtime).
Complete Code - Examples/Part_4/...
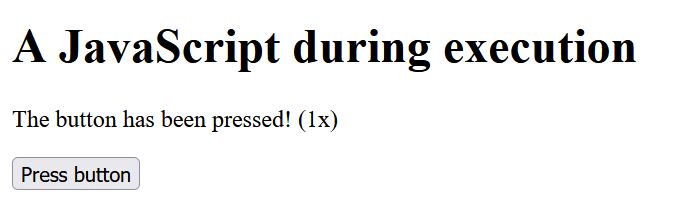
 let counter = 1;

 function changeText() {
     document.querySelector('p').innerHTML =
         "The button has been pressed! (" + counter + "x)";
     counter++;
 }
Once the button has been pressed, a click event is fired, whereupon onClick="changeText()" executes the JavaScript with the changeText() function. The function changes the content of the first p element found and replaces the text in between with "The button has been pressed! (1x)", increasing the value of counter by 1 after each new confirmation.
Before pressing the button:
After the button is pressed:
Comment JavaScript code
It is helpful to add comments to the JavaScript code to be able to understand later what is happening there.
A one-line comment:
 // One comment
 // console.log('One comment')
A multi-line comment:
 /* A comment,
    that extends over
    several lines */
3. The use of variables in JavaScript
Variables are declared in JavaScript using either the let or var keyword, the variable name is followed by a = character and the value. Such variable initialization is done as in algebra:
 let price = 10;                     // Number
 let pi = 3.14;                      // Number
 let aMessage = "Message";           // String
 let userName = 'Rick Sample';       // String
 let num = 12345;                    // Number
The variable name must not have any spaces or special characters and must start with a letter. The underscore _ can be used as the last character, the $ is theoretically allowed at the beginning or within the name. There is also a distinction between upper and lower case (var1 and Var1 are two different variable names).
A statement is always terminated with a semicolon ;. An instruction in JavaScript is almost every line of a script. Consequently, statements are also the declaration and initialization of variables or the calling of functions.
JavaScript keywords also cannot be used as variable names, these are:
Everything between the single or double apostrophes is recognized as a string by the interpreter:
 let aText01 = "This is a string";           // String
 let aText02 = 'This is a string';           // String
Without single or double quotation marks, it is a numeric value:
 let price = 10;                     // Number
 let pi = 3.14;                      // Number
 let textNum = "1234";                    // Caution! This is a string
3.1. Initalize and assign values
-
create a variable with the keyword let
let myName;             // agreement of a variable
console.log(myName);    // Output: undefined
-
Such an empty agreed variable without an assigned value has a value, this is undefined. With the assignment operator a value can be assigned again at any time:
 let myName;
 myName = "Sample";      // Value assignment
 console.log(myName);    // Output: Sample
-
or the value can be added immediately:
 let myName = "Sample";
 console.log(myName);    // Output: Sample
-
Likewise, more than one variable can be declared at once, in one statement, separated by commas:
let firstName, lastName, myAge;
-
the initialization of several variables:
 let firstName = "Sample", lastName = "Rick", myAge = 42;
 console.log (firstName + "," + lastName + "," + myAge);     // Output: Rick, Sample, 42
-
Variables can also be assigned a new/different value:
 let firstName = "Rick";
 console.log(firstName);    // Output: Rick
 firstName = "Richard";
 console.log(firstName);    // Output: Richard
3.2. Define constants
JavaScript can also be used to define constants, for which the keyword const is available. The value of such a constant cannot be changed after initialization. In practice, such constants are usually rendered with capital letters:
 const PI = 3.141592653589793;       // create constant
 console.log(PI);                    // Output: 3.141592653589793
 PI = 3.14;                          // Error! Constant can no longer be changed.
 console.log(PI);                    // Uncaught TypeError: Assignment to constant variable
use strict - strict mode
JavaScript is executed in Standard mode without any precaution. In strict mode some constructs can cause errors that are executable in standard mode without any problem, because there are some restrictions in strict mode. This sounds bad at first, but since JavaScript is very fault tolerant, the website may work locally, but as soon as the website is hosted, errors may occur. And that's where the use strict mode is helpful, because it doesn't allow these errors from the beginning.
To enable strict mode, it is enough to write this statement at the beginning of the JavaScript program:
 "use strict";

 // JS code
Example:
 "use strict";
 text = "A Message";     // strict mode error
 console.log(text);      // ReferenceError: text ist not defined
4. Overview of JavaScript data types
In JavaScript, no data type needs to be specified during variable declaration, unlike other languages such as C++ or Java. Since the data type in JavaScript is determined at runtime based on the value passed.
JavaScript defines several data types.
-
The primitive types: string, number, boolean, symbol.
-
special types: undefined, null
-
composite data type: object
The type of a variable is returned with the typeof operator. Possible return values are string, number, boolean, object, function, symbol and undefined.
4.1. data type number
In JS, there is no difference between integers and floating point numbers. All data types for numbers are internally represented by JS as 64-bit floating point values.
 let integerValue = 12345;
 console.log (typeof integerValue);              // Output: number
 let floatingPoint_Value = 123.456;
 console.log (typeof floatingPoint_Value);       // Output: number
If a value does not correspond to a correct numerical value, NaN (not a number) is used as the value. If the value range has been exceeded or fallen below, Infinity or -Infinity is used as the value. Therefore there are two constants Number.POSITIVE_INFINITY and Number.NEGATIVE_INFINITY. If the smallest or largest possible number is to be determined, the constants Number.MIN_VALUE and Number.MAX_VALUE are used.
 console.log (Number.MIN_VALUE);              // Output: 5e-324
 console.log (Number.MAX_VALUE);              // Output: 1.7976931348623157e+308
 console.log (Number.POSITIVE_INFINITY);      // Output: Infinity
 console.log (Number.NEGATIVE_INFINITY);      // Output: -Infinity
When specifying floating point numbers, a period must be used instead of a comma. For higher or smaller floating point numbers, E-notation can be used. A specification of 5e-3 corresponds to 0.005.
 let floatingPoint_Value_1 = 5e-3;
 console.log (typeof floatingPoint_Value_1);       // Output: 0.005
 let floatingPoint_Value_2 = 1.2e4;
 console.log (typeof floatingPoint_Value_2);       // Output: 12000
4.2. data type string
Strings are used to represent text and consist of a string of 0 or more 16-bit characters. Such string literals can be inserted in JS by placing a text between single or double quotes.
 let text1 = "String in JS";
 console.log (typeof text1);            // Output: string
 let text2 = "Another string in JS";
 console.log (typeof text2);            // Output: string
 let text3 = "1234";
 console.log (typeof text3);            // Output: string
Escape sequences are control characters that can be inserted in strings as variable values. Such control characters are introduced with \ followed by the letter marking the control character.
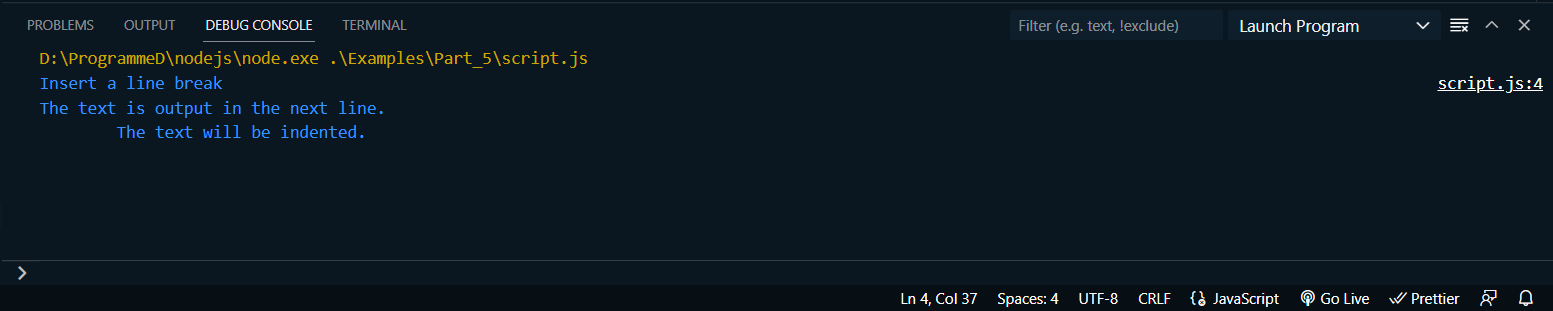
Complete Code - Examples/Part_5/...
 let text4 = "Insert a line break\n";      // Line break at the end
 let text5 = "The text is output in the next line. \n";
 let text6 = "\tThe text will be indented.\n";
 console.log (text4 + text5 + text6);
Output:
The most important control characters:
| Control character |
Meaning |
| \' |
a single quote within the string |
| \" |
double quotation mark within the string |
| \\ |
backslash character within the character string |
| \n |
line break in JS on console, for web pages <br> applies |
| \t |
tab character, one indent to the right |
| \uXXX |
this adds a Unicode symbol |
Single strings are linked with the + operator:
   let text7 = "to be";
   let text8 = "not";
   let text9 = text7 + "or" + text8 + text7;
   console.log (text9);                       // Output: to be or not to be
When mixing numbers and strings with the + operator, the result will always be a string:
   let text10 = "The value is: " + 199,99 + 100;
   console.log (text10);                       // Output: The value is 199,99100
Template strings
These are string symbols that may span multiple lines and also allow embedded JavaScript expressions. Such template strings are enclosed between two grave accents `. This makes it possible to do without line breaks with \n:
   let text11 = "last line";
   console.log("first line\n" + "second line\n" + text11);
   // first line
   // second line
   // last line
the same:
   console.log(`first line
   second line
   ${text11}
   `)
To insert JavaScript expressions into the strings, the notation ${expression} is used (expression here text11).
data type boolean
The Boolean data type can hold only two values, true and false. A boolean value is a truth value and usually expresses the validity of a condition. Conditions that contain the value 0, an empty string, NaN, undefined or null are also interpreted as false. All other values are true.
let val1 = 123;
let val2 = 456;
console.log(val1 > val2);    // Output: false
console.log(val1 < val2);    // Output: true

let isAdmin = false;
let isUser = true;
4.4. Data type undefined and null
A variable that has not yet been assigned a value has the value undefined. Also a non-existing object property or non-existing function parameters have the value undefined.
 let name;
 console.log(name);     // Output: undefined
 let name = "Rick Sample";
 console.log(name);     // Output: Rick Sample
With the data type null, on the other hand, an empty object is represented:
 let name = {
   fname: 'Rick',
   lname: 'Sample'
 };
 console.log(name);     // Output: {fname: "Rick", lname: "Sample"}
 name = null;
 console.log(name);     // Output: null
The data type null is a keyword. The type null was listed as a data type, but a typeof null returns the type object. Variables that are initalized with null are object types. A variable that is not initalized, on the other hand, is undefined. The value undefined simply indicates that a variable has not yet been initialized with a value. null, on the other hand, is an empty object.
4.5. Data type object
Objects are a collection of properties and methods. A method is a function and a property, value or set of values of an object.
 let name = {
   fname: 'Rick',
   lname: 'Sample'
 };
 console.log(name);     // Output: {fname: "Rick", lname: "Sample"}
4.6. Convert data types
In this example, the + operator has output the value as a string.
 let text10 = "The value is: " + 199,99 + 100;
 console.log (text10);                       // Output: The value is 199,99100
However, this only applies to the + operator in conjunction with strings. If other operators like -, * or / are used, JavaScript does not convert the numbers into strings anymore, but tries to convert the strings into numbers.
 let text12 = "100" - 42;                    // 58
 console.log(typeof text12);                 // Output: number
 let text13 = "100" + 42;                    // "10042"
 console.log(typeof text13);                 // Output: string
 console.log("6" / "2");                     // Output: 3
JS cannot know on its own which data type is to be used. For such purposes JS offers the function parseInt() and parseFloat. With parseInt() a string is converted into an integer. With parseFloat a string is converted into a floating point number.
5. Arithmetic operators for calculation
Arithmetic operators are for example +, -, *, / or %.
 let val1 = 101 + 202;
 console.log(val1);                    // Output: 303
 console.log(88 - 46);                 // Output: 42
 let val2 = val1 * 3;
 console.log(val2);                    // Output: 909
 console.log(val2 / 9);                // Output: 101
Here, too, as in mathematics, the dot before dash rule applies.
 let val3 = 100 / 2 - 5 * 4;
 console.log(val3);                // Output: 30
 let val4 = 5 + 6 * 2;                    // 17
 let val5 = (5 + 6) * 2;                  // 22
In JS there is a Math object which can be used for various mathematical functions. Generally this function should be used if no rounding errors should occur. With Math.random() a random number is returned. Or Math.sqrt(x) which returns a square root of x.
6. Conditional statements
Conditional statements affect the flow of the program by defining a condition and then using it to decide at what point the program will continue.
-
if: is used to branch a block of statements that will be executed only if the condition in the () parenthesis is equal to true.
-
else: is used with a block of statements that will only be executed if the previously checked if condition is equal to false.
-
else if: is used with a block of statements to test another condition if the preceding if was equal to false. Multiple else if can be used after a preceding if. Alternatively, switch() can be used for such multiple branches.
 if (condition == true) {
   // statement if condition equals true
 } else  {
   // statement if condition equals false
 }
6.1. true or false
A boolean truth value in JS is specified as true or false, anything containing a true value equals true and anything without a true value equals false. But in JS you are not limited to true and false. There are also values that are considered false, such as undefined, null, 0 or " "(falsy). true can also be objects (without properties), functions or arrays.
• Real values so true are for example:
 1234
 1.234
 -1
 "One text"
 4 + 2 * 3
 let mytext = 'One text';
 if (mytext) {
   console.log('"mytext" is a valid text.');       // Output
 } else {
   console.log('"mytext" is an invalid text.');
 }
Since the if condition equals true, so mytext is a valid value, the corresponding output in the brackets of the if condition is executed.
• No real values so false are for example:
 0             // The number 0
 ""            // empty string
 var val01;    // empty variable is undefined
 var val02 = false;
 60 / "text"   // NaN
 null          // always false
 NaN           // Not a number
 let mytext = 'One text';
 let val01 = 60;
 if (val01 / mytext) {
   console.log('Calculation successful');
 } else {
   console.log('NaN -> no valid value');
 }
Here the statements are executed in the alternate else block because the if condition returns false.
6.2. Comparison operators
Besides true and false, variables and values can be compared with the different comparison operators to check if they are true or false.
| Operator |
Description |
Example (x=6; y=5) |
| == |
equal to |
x == 5; // false |
| != |
not equal to |
x != 5; // true |
| === |
same value and same type |
x === y; // false, x === 6; // true |
| !== |
different value or different type |
x !== y; // true, x !== 6; // false |
| < |
greater than |
x < y; // true |
| > |
less than |
x > y; // false |
| <= |
greater than or equal to |
x <= y; // true, x <= 6; // false |
| >= |
less than or equal to |
x >= y; // false, x >= 6; // true |
The comparison operators == and !==. These are necessary because with comparison operators an implicit type conversion is performed before the comparison so that these values can be compared.
6.3. Use if branches
Complete Code - Examples/Part_6/...
 let age = prompt('How old are you');
 if (age >= 18) {
   console.log('Access allowed');
 } else {
   console.log('Access denied');
 }
If the age is 18 or higher, access is granted, if not then no access.
 let strVal = "1234";
 let iVal = 1234;
 if (strVal == iVal) {                    // true, because type conversion
   console.log("Both values are equal");
 } else {
   console.log('Values are different');
 }
Due to the type conversion true is returned. If == is replaced by ===, true is no longer returned because the value is the same but the type is not.
6.4. Use selection operator
An if-else construct can be shortened with the so-called selection operator. The structure is as follows:
let val = condition ? value1 : value2;
means the same as:
 let val;
 if (condition) {
   val = value1;
 } else {
   val = value2;
 }
Here the value value1 is assigned to the variable val if condition is equal to true. If condition is equal to false, the value2 is assigned to val.
another example:
 let pwd = prompt('Enter password: ');
 let isAdmin = pwd == 123456789 ? true : false;
 console.log(isAdmin);
Here with prompt() a pseudo-password is queried and assigned to the variable isAdmin according to the input true or false.
6.5. Logical operators
The logical operators in JS are && (AND), || (OR) and ! (NOT). Logical operators are used with truth values. If you use numbers, they are implicitly converted to a truth value before they are linked with &&, || or !.
-
&& : Expressions linked with the AND operator return true only if all expressions are true:
 if (ival1 > 0 && ival2 > 0) {
   // Both expressions are true
 }
-
|| : Expressions concatenated with the logical OR operator return true if at least one of the expressions is true:
 if (ival1 > 0 || ival2 > 0) {
   // At least one expression is true
 }
-
! : The logical NOT operator is used to negate an expression. From true can be made false and reverse:
 if (!(ival > 0)) {
   console.log("ival is not greater than 0")
 }
example:
 let val = prompt('Enter a value from 1 - 100: ');
 if (val >= 1 && <= 100) {
   console.log("The value meets the requirements.")
 } else {
   console.log("Incorrect input: + val");
 }
Using the logical AND, here the expressions (whether the entered value val is equal to or greater than 1 AND equal to or less than 100) have been linked, and only true is returned if both expressions are true. If the logical OR operator had been used instead, true would always be returned (if the entered value is greater than or equal to 1), because the second expression would not have been checked at all. But if the value is negative or 0, the OR operator will also evaluate the second expression. If the logical OR operator is used, the check is aborted at the first true, because the condition is that at least one operator is true.
6.6. Multiple branching with switch
If several conditions are to be checked, theoretically several if queries can be used one after the other. Or you can use the switch case distinction. In JS, switch supports values with arbitrary types. It is also possible to have values determined dynamically first via function calls.
 switch(expression) {
   case label_1:
      statement;
      [break];
   case label_2:
      statement;
      [break];
 ...
   default:
      statement;
 }
With this case distinction, a matching value in case is searched for the expression in switch. If a case marker matches the switch evaluation, the program execution is executed after this case marker. If no case marker matches the switch evaluation, an optional default marker can be used, which will be executed as an alternative. Of particular importance in a switch case distinction are the break statements at the end of a case mark. break is used to instruct the program to jump out of the switch block and continue with the program execution after it. If no break statement is used, all further statements in the switch block are executed until the next break statement or until the end of the block.
 switch(new Date().getDay()) {
   case 0:
      console.log("Today is Sunday")
      break;
   case 6:
      console.log("Today is Saturday")
      break;
   default:
      console.log("Today is a weekday")
 }
Here in switch a Date object is created and with it the method getDay() is called. The method getDay() returns a weekday in the form of a number. 0 is returned for Sunday, 1 for Monday etc to 6 for Saturday. In the example the return value is compared with the case marks 0 and 6. If one of the marks matches, a corresponding output is returned in the JavaScript console. If none of the case marks match, the return value is 1,2,3,4,5 and it is a normal weekday, so no case marks are used here anymore, but default.
7. Loops - repeat program instructions several times
Loops are good for repeating certain statements multiple times. JS supports several types of loops:
7.1. Increment and decrement operator
Here the value of a variable is increased or decreased by 1. Mainly these two operators are used with loops.
| Control character |
Meaning |
| ++ |
Increment operator; variable is incremented by 1 |
| -- |
Decrement operator; variable is decreased by 1 |
There are two options for use in each case:
| Using |
Meaning |
| val++ |
Postfix notation; increments the old value of val, still passes the old value to the current expression |
| ++val |
Prefix notation; increments the old value of val and passes it immediately to the current expression |
| val-- |
Postfix notation; reduces the value of val, still passes the old value to the current expression |
| --val |
Prefix notation; reduces the value of val and passes it immediately to the current expression |
let iVal = 1;
console.log("iVal = " + iVal);          // Output: iVal = 1
ival++;
console.log("iVal = " + iVal);          // Output: iVal = 2
console.log("iVal = " + iVal++);        // Output: iVal = 2
console.log("iVal = " + iVal);          // Output: iVal = 3
console.log("iVal = " + ++iVal);        // Output: iVal = 4
7.2. for loop
The flexible for loop is probably the most commonly used loop.
for(Initialization; condition; increment/decrement) {
 // Statement block that will be executed
}
Initalization is executed only once when the loop is started and is usually used to set a counter variable for the loop. As long as the condition equals true, the loop is executed again. If fasle, the loop is terminated and program execution continues after the statement block of the for loop. As a condition it is often checked whether the counter variable corresponds to a certain value. Increment/Decrement is always executed when the statement in the statement block have been executed.
for(let i = 0; i < 3; i++) {
 console.log(i + 1 + "-th loop pass");
}
Output to the console:
1st loop pass
2nd loop pass
3rd loop pass
Here the statement was executed three times in the loop. The count variable i was first set to 0, the condition i<3 was checked and then the statement block behind it was executed. The output in the JS console shows how many times the loop has been executed. Next,the loop variable is incremented by 1 with i++ and the condition i < 3 is checked again, which (i = 1) is still true. The process is repeated until the of i equals 3 and thus the condition i < 3 returns false.
7.3. while loop
The while loop is a header driven loop and will be executed as long as the condition in while returns true.
while(condition) {
 // Statement block that will be executed
}
example:
let i = 0;                   // Initialize counter variable
while(i < 3) {               // Check condition
 console.log(i + 1 + "-th loop pass");
 i++;                       // Increase counter variable
}
7.4. do-while loop
The do-while loop is a foot-controlled loop, which means that the condition is not checked until the end, when the statement block has been executed. Thus, in the do-while loop, the statement block of the loop is executed at least once before the condition is checked.
do {
 // Statement block that will be executed
} while(condition);
example:
let i = 0;
do {
 console.log(i + 1 + "-th loop pass");
 i++;
} while(i < 3);
7.5. End statement block with break
A statement that may be useful in a loop is the break statement. If a simple break is used within a statement block of the loop, it will jump out of the loop execution and the script will continue behind the loop.
let i = 0;
while(i < 8) {
 console.log(i + 1 + "-th loop pass");
 i++;
 if (i === 4) {
    console.log("End loop with break");
    break;
 }
}
Actually, this loop should be run through 8 times in while. However, this loop is only run through 4 times, because then the if-condition i === 4 returns true and thus the break statement ensures that the loop is ended prematurely.
7.6. Jump to loop start with continue
With continue a loop pass can be terminated and then jump back to the loop start. This is helpful if due to a condition the further loop pass should not be executed.
let i = 0;
while(i < 10) {
 i++;
 if (i % 2 === 1) {
    continue;
 }
 console.log("Value divisible by 2: " + 1);
}
In the example, a loop is incremented from 1 to 10 and passed through. At each loop pass it is checked whether the value of i % 2 results in a remainder. If the condition is true, continue jumps back to the beginning of the loop. If the condition is false, it is a number divisible by two or an even value, and the number is output.