Introduction to Web APIs
Introduction to Web APIs: Video and Audio API, Canvas 2D API, Geolocation API, Drag & Drop API, Offline Data, Web Workers, Server-Sent Events...
1. Video and audio media API
Playing video and audio files is possible in HTML5 with the <video> and <audio> elements. The appearance of the controls (play, pause, volume, etc.) are predefined by the web browser and cannot be changed. But it is also possible to control media files using the JavaScript API. The advantage of custom controls for playing media files using the Media API is that the design and functionality of the player can be determined by the user and the controls can be styled using CSS or graphics.
The Media API provides a fairly large set of properties and methods. Furthermore, many event types are available, which can be used to react accordingly.
A complete overview of all media events can be found here HTML - Living Standard.
1.1. Controlling video files with JavaScript and the Media API
Example:
Complete Code - Examples/Part_1/...
 <div class="video_canvas">
     <video width="640">
         <source src="video/Bugs.webm" type="video/webm">
         <source src="video/Bugs.mp4" type="video/mp4">
         Your web browser does not support video tag.
     </video>
     <p>
         <button onclick="playVideo()" id="play">Play</button>
         <button onclick="resize()" id="size">Zoom</button>
         <button onclick="control()" id="ctrl">Display controls</button>
         <button onclick="restart()">Restart</button>
         <button onclick="mute()" id="mute">Sound off</button>
     </p>
 </div>
 let vid = document.querySelector('video');

 function playVideo() {
   let but = document.querySelector('#play');
   if (vid.paused) {
     vid.play();
     but.textContent = "--Pause--";
   } else {
     vid.pause();
     but.textContent = "Play";
   }
 }
 ...
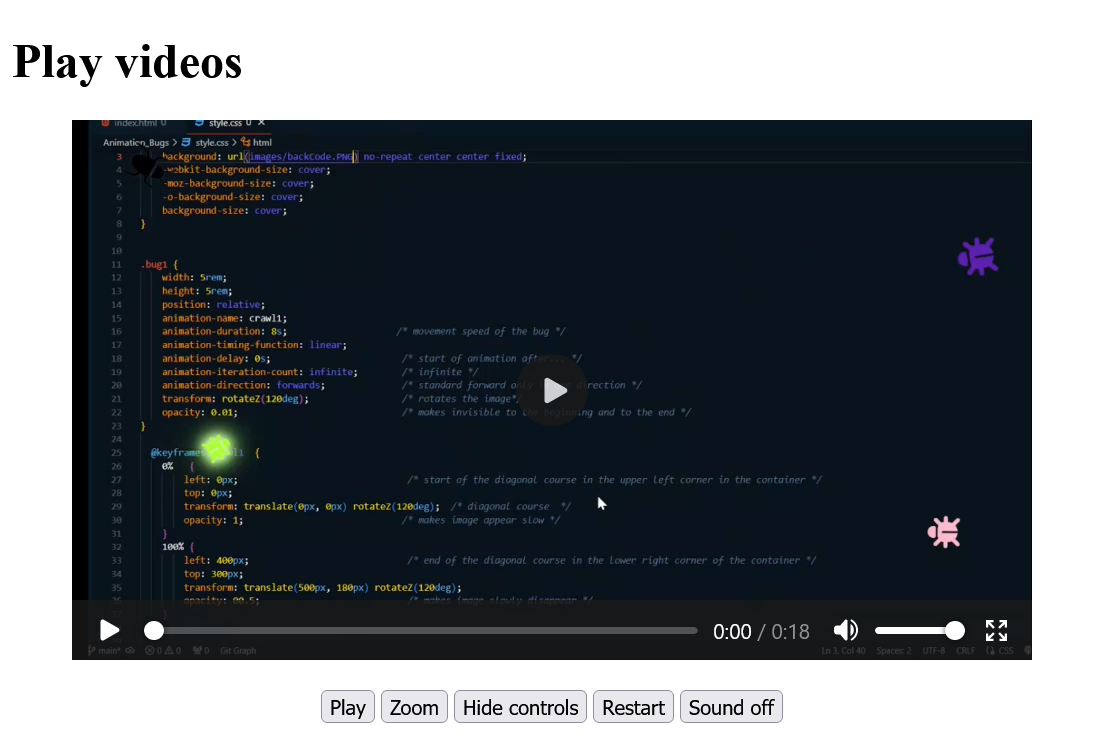
In this example, some methods and properties of the JavaScript Media API are used for the video element. The play() and pause() methods start and pause the video respectively. The playVideo() function first checks whether the paused property is true or not. According to the evaluation the video is started or stopped and the label on the button changes accordingly. With the property width the size of the video, in the function resize(), is changed. Also the fade in and fade out of the controls can be enabled or disabled at any time using the controls property, as seen in the control() function. The currentTime property is used to set the position of the video to a specific time in seconds. Here it has been set to 0, which causes the video to play from the beginning. The muted property controls the sound. With false the sound is switched off with true switched on. A volume control can be realized with the volume property, the values from 0.0 to 1.0 represent the respective volume.
1.2. Controlling audio files with JavaScript and the Media API
The same media API is used for the audio element as for the video element, so everything can be done that was done for the video element.
Example:
Complete Code - Examples/Part_2/...
 <img src="images/guitar-fender.jpg" alt="Fender Guitar" width="400"><br>
 <audio>
     <source src="audio/Californication.mp3" type="audio/mpeg">
     <source src="audio/Californication.wav" type="audio/wav">
     <source src="audio/Californication.ogg" type="audio/ogg">
     This web browser does not support audio tag.
 </audio>
 <div>
     <button onclick="play()" id="play">Play</button>
     <button onclick="fast()" id="fast">2x</button>
     <button onclick="rewind()">Rewind</button>
     <button onclick="mute()" id="mute">Sound off</button>
     <button onclick="control()" id="ctrl">Display controls</button>
 </div>
 let aud = document.querySelector('audio');
 // Pause and playback function
 function play() {
   let play = document.querySelector('#play');
   if (aud.paused) {
     aud.play();
     play.textContent = "--Pause--";
   } else {
     aud.pause();
     play.textContent = "Play";
   }
 }
 // 1x/2x speed
 function fast() {
   let play = document.querySelector('#fast');
   if (aud.playbackRate == 1.0) {
     aud.playbackRate = 2.0;
     play.textContent = "1x";
   } else {
     aud.playbackRate = 1.0;
     play.textContent = "2x";
   }
 }
 // Start audio from beginning
 function rewind() {
   aud.currentTime = 0;
 }
 // Switch sound on/off
 function mute() {
   let mtxt = document.querySelector('#mute');
   if (aud.muted) {
     aud.muted = false;
     mtxt.textContent = "Sound off";
   } else {
     aud.muted = true;
     mtxt.textContent = "Sound on";
   }
 }

 function control() {
   let ctr = document.querySelector('#ctrl');
   if (aud.controls == false) {
     aud.controls = true;
     ctr.textContent = "Hide controls";
    } else {
     aud.controls = false;
     ctr.textContent = "Display controls";
   }
 }

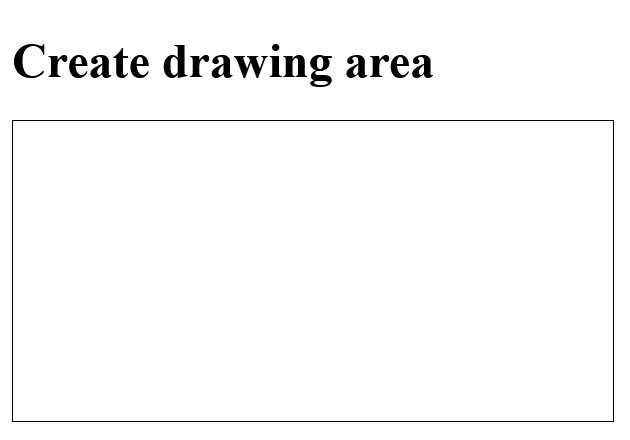
2. The Canvas 2D API
The HTML element <canvas> is initially nothing more than a white area on which to draw using JavaScript. Such an empty drawing area can be specified as follows:
Complete Code - Examples/Part_3/...
 <body>
   <h1>Create drawing area</h1>
   <canvas id="myCanvas" width="400" height="200" style="border:1px solid #000000;">
     Your browser does not support the canvas element.
   </canvas>
 </body>
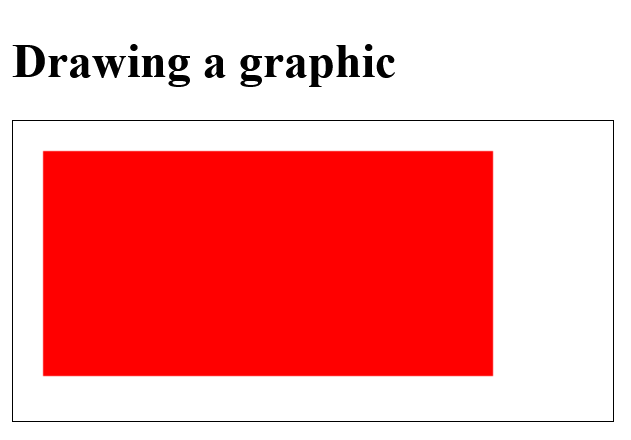
2.1. Drawing on a <canvas> element
The actual drawing on the <canvas> elements is done with JavaScript. For this, a connection to the <canvas> element must be established with JavaScript. This is done with the HTML attribute id of <canvas> and the DOM method querySelector().
let canvas = document.querySelector('#myCanvas');
Another connection to an interface is needed so that something can be drawn on the canvas surface. This interface is called a Rendering Context and provides the necessary methods and properties for drawing. The connection to the context object is made with getContext() and takes as parameter the type of the context, here it is 2d. An object of type CanvasRenderingContext2D is returned. The interface is accessed with getContext() and the string 2d in it.
 let canvas = document.querySelector('#myCanvas');
 let ctx = canvas.getContext("2d");
Example:
Complete Code - Examples/Part_4/...
 let canvas = document.querySelector('#myCanvas');
 if (canvas.getContext) {
   let ctx = canvas.getContext("2d");
   // sets the color to fill the drawing
   ctx.fillStyle = "red";
   // ctx.fillRect(0, 0, 300, 150); - start point in the upper left corner 0,0, with a 300 x 150 pixel rectangle
   // the starting point is shifted by 20 pixel each (x,y)
   ctx.fillRect(20, 20, 300, 150);
 }
3D context (WebGL)
To use the 3D context, the getContext() method must be given the webgl parameter (instead of 2d) for a 3D rendering context in the web browser. The object returned is of type WebGLRenderingContext. This is the version 1 of WebGL. Meanwhile there is a version 2, which is called with the parameter webgl2. This topic is very extensive and therefore I will not go into it further here.
2.2. Methods used to draw on the <canvas> element
The following example demonstrates some methods for drawing rectangles, lines, circles, and text:
Complete Code - Examples/Part_5/...
 <canvas id="myCanvas" width="400" height="250" style="border:1px solid lightgrey;">
     Your browser does not support the canvas element.
 </canvas>
 let canvas = document.querySelector('#myCanvas');
 if (canvas.getContext) {
   let ctx = canvas.getContext("2d");
   // Rectangle
   ctx.fillStyle = "lightgreen";           // color
   ctx.fillRect(20, 20, 300, 150);         // draws the shape; start point 20, 20 (x,y), rectangle 300 x 150 pixel

   // graphic with gradient
   //var grd = ctx.createLinearGradient(20, 20, 300, 150);
   //grd.addColorStop(0, "yellow");
   //grd.addColorStop(1, "red");
   //ctx.fillStyle = grd;
   //ctx.fillRect(20,20,300,150);

   ctx.strokeRect(20, 20, 300, 150);       // draws shape as frame without filling
   ctx.clearRect(50, 50, 100, 50);         // deletes specified pixels
   ctx.strokeRect(50, 50, 100, 50);
   // Line
   ctx.lineWidth = 10;                     // line thickness
   ctx.moveTo(400, 0);                     // moves the path to a specified point without drawing a line
   ctx.lineTo(0, 250);                     // adds a line from the last point in the path to a new point
   ctx.stroke();                           // draws the path
   // Circle
   ctx.lineWidth = 5;
   ctx.beginPath();                        // starts a path or resets the current path
   ctx.arc(320, 170, 75, 0, 2 * Math.PI);  // creates a circle or a part of a circle
   ctx.stroke();
   ctx.fillStyle = "red";
   ctx.fill();                             // fills the current path
   // Text
   ctx.fillStyle = "green";
   ctx.font = "40px Arial";                // font-size, font
   ctx.fillText("canvas", 170, 50);        // draws the text
   ctx.lineWidth = 1;
   ctx.strokeText("canvas", 40, 135);      // draws text as frame without filling
 }
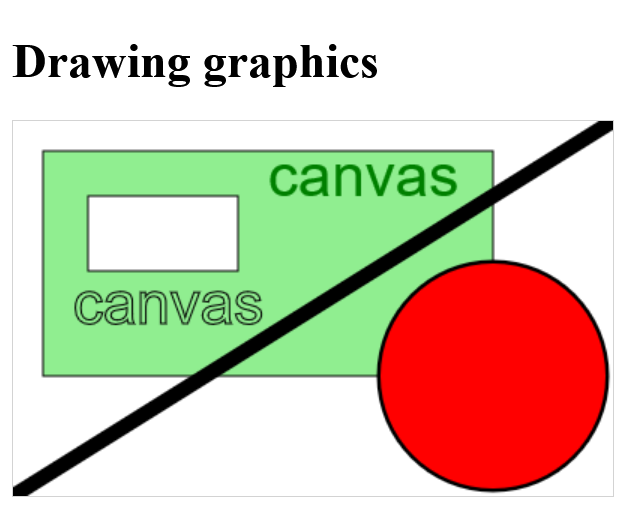
The fillStyle() property sets the color used with fillRect() or fillText. With fill() and stroke() there are two types of methods to draw a shape. With the fill...() variant the shapes are drawn with filled color, with the stroke...() variant only a frame is drawn in the respective color without filling.
Drawing single or multiple lines can be realized with the methods moveTo(), lineTo() and stroke(). With moveTo(x, y) the imaginary drawing pen is set at a certain position and with lineTo() the end point of the line is determined and with stroke() the line is drawn afterwards. With lineWidth() the thickness of the line is set.
To draw a circle the method arc() can be used. The path is created with beginPath and with arc() the circle is drawn. The fill and stroke variants cannot be used here for drawing, but for filling with color or setting a frame these methods can be used.
Text is drawn with either fillText() or strokeText(). The font or size is set with the font property.
2.3. Copy and manipulate images with <canvas>
With the method drawImage() it is possible to output images to a canvas element. The bitmaps can be read with the method getImageData(), and then you have full access to the pixels by traversing pixel by pixel in an array and thus it is possible to manipulate this image. If, on the other hand, pixels are to be drawn on a canvas element, this can be done with the putImageData() method.
Complete Code - Examples/Part_6/...
 <body>
   <h1>Drawing a picture</h1>
   <canvas id="myCanvas" width="330" height="120" style="border:1px solid lightgrey;">
     Your browser does not support the canvas element.
   </canvas>
   <br>
   <button onclick="copy()">Copy</button>
   <button onclick="copy_invert()">Copy and Invert</button>
   <script src="script.js"></script>
 </body>
let canvas = document.querySelector('#myCanvas');
if (canvas.getContext) {
   let ctx = canvas.getContext("2d");
   let img = new Image();
   img.src = "images/flower_960.jpg";
   img.onload = function() {
     ctx.drawImage(img, 10, 10, 150, 100);
   };

   function copy() {
     let imgData = ctx.getImageData(10, 10, 150, 100);
     ctx.putImageData(imgData, 170, 10);
   }

   function copy_invert() {
     let imgData = ctx.getImageData(10, 10, 150, 100);
     let i = 0;
     while (i < imgData.data.length) {
         imgData.data[i] = 255 - imgData.data[i++];
         imgData.data[i] = 255 - imgData.data[i++];
         imgData.data[i] = 255 - imgData.data[i++];
         imgData.data[i] = imgData.data[i++];
     }
     ctx.putImageData(imgData, 170, 10);
   }
 }
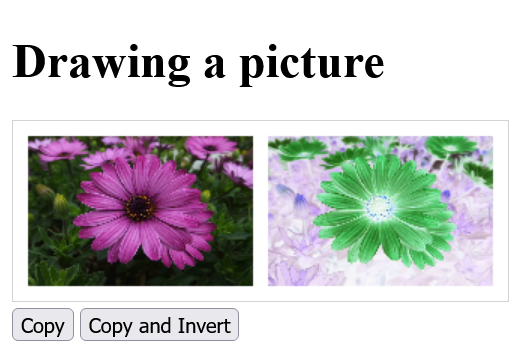
This is a general algorithm for manipulating images, like other image editors use to invert images. In this and similar ways a lot of effects can be created. The image object can also be used from an img element in the document.
Uncaught SecurityError
Since it is possible to read parts of the image with the getImageData() method, it may happen that the error Uncaught SecurityError is returned in the JavaScript console. This is the case, for example, if the getImageData() method is used on the local computer. For it to work, the image must be on the same domain as the code.
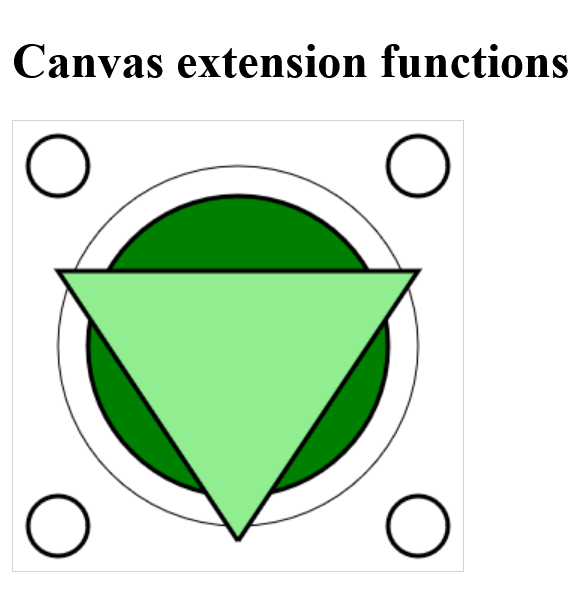
2.4. Create your own functions (wrapper) for <canvas>
Since functions for circles and polygons are missing, it makes sense to pack this application order with the 2D rendering context into functions and these can then be easily called when creating the desired shape.
Here is an example of a collection of such functions, in JavaScript:
Complete Code - Examples/Part_7/...canvasFunc.js:
 /* Canvas help functions          */
 function fillCircle(context, cx, cy, r) {
   context.beginPath();
   context.arc(cx, cy, r, 0, 2*Math.PI);
   context.fill();
   context.closePath();
 }

 function strokeCircle(context, cx, cy, r) {
   context.beginPath();
   context.arc(cx, cy, r, 0, 2*Math.PI);
   context.stroke();
   context.closePath();
 }

 function fillPolygon(context, points) {
   xy = points.split(" ");
   context.beginPath();
   if(xy.length > 0) {
     // determine start end point
     start_end = xy[0].split(",");
     context.moveTo(start_end[0], start_end[1]);
   }
   // run through individual points
   for( i=1;  i< xy.length; i++) {
     xyN = xy[i].split(",");
     context.lineTo(xyN[0], xyN[1]);
   }
   context.lineTo(start_end[0], start_end[1]);
   context.fill();
   context.closePath();
 }

 function strokePolygon(context, points) {
   xy = points.split(" ");
   context.beginPath();
   if(xy.length > 0) {
     // determine start end point
     start_end = xy[0].split(",");
     context.moveTo(start_end[0], start_end[1]);
   }
   // run through individual points
   for( i=1;  i< xy.length; i++) {
     xyN = xy[i].split(",");
     context.lineTo(xyN[0], xyN[1]);
   }
   context.lineTo(start_end[0], start_end[1]);
   context.stroke();
   context.closePath();
 }
This script canvasFunc.js with the functions, for the circle and the polygon, must be included in the HTML document together with draw.js, which contains the main instructions.
 <body>
   <h1>Canvas extension functions</h1>
   <canvas id="myCanvas" width="300" height="300" style="border:1px solid lightgrey;">
     Your browser does not support the canvas element.
   </canvas>
   <script src="canvasFunc.js"></script>
   <script src="draw.js"></script>
 </body>
draw.js
 let canvas = document.querySelector('#myCanvas');
 if (canvas.getContext) {
   let ctx = canvas.getContext("2d");
   ctx.fillStyle = "green";
   fillCircle(ctx, 150, 150, 100);
   ctx.lineWidth = 3;
   strokeCircle(ctx, 150, 150, 100);
   strokeCircle(ctx, 30, 30, 20);
   strokeCircle(ctx, 30, 270, 20);
   strokeCircle(ctx, 270, 30, 20);
   strokeCircle(ctx, 270, 270, 20);
   ctx.lineWidth = 1;
   strokeCircle(ctx, 150, 150, 120);
   ctx.lineWidth = 3;
   ctx.fillStyle = "lightgreen";
   fillPolygon(ctx, points = "150,280 270,100 30,100");
   strokePolygon(ctx, points = "150,280 270,100 30,100");
 }
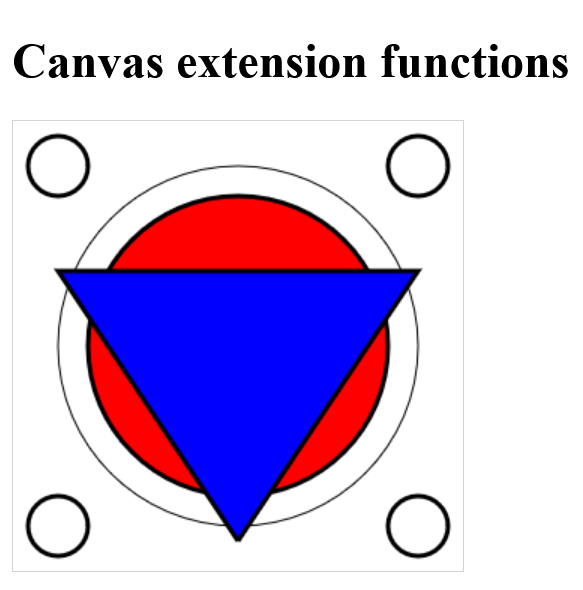
2.5. Extending the CanvasRenderingContext2D
In section 2.4. it was shown how the 2D rendering context can be used to access a canvas element with auxiliary functions in a simplified way. However, this is still relatively cumbersome because global function calls have to be used.
Draw a frame around a circle with the help function:
 ctx.lineWidth = 3;
 strokeCircle(ctx, 150, 150, 100);
However, the same looks a bit better with the already implemented strokeRect() method, because dr 2D-Context does not have to be passed as a function parameter:
 ctx.lineWidth = 3;
 ctx.strokeRect(20, 20, 300, 150);
It would be better, more consistent and more logical to use the self-written helper function strokeCircle() like this:
ctx.strokeCircle(150, 150, 100);
To retrofit something like this you only have to extend the prototype in CanvasRenderingContext2D.prototype.name with the corresponding method:
Complete Code - Examples/Part_8/...
canvasExt.js:
 /* Canvas extension         */
 CanvasRenderingContext2D.prototype.fillCircle = function(cx, cy, r) {
   this.beginPath();
   this.arc(cx, cy, r, 0, 2*Math.PI);
   this.fill();
   this.closePath();
 }

 CanvasRenderingContext2D.prototype.strokeCircle = function(cx, cy, r) {
   this.beginPath();
   this.arc(cx, cy, r, 0, 2*Math.PI);
   this.stroke();
   this.closePath();
 }

 CanvasRenderingContext2D.prototype.fillPolygon = function(points) {
   xy = points.split(" ");
   this.beginPath();
   if(xy.length > 0) {
    // determine start end point
    start_end = xy[0].split(",");
    this.moveTo(start_end[0], start_end[1]);
   }
   // run through single points
   for( i=1;  i< xy.length; i++) {
     xyN = xy[i].split(",");
     this.lineTo(xyN[0], xyN[1]);
   }
   this.lineTo(start_end[0], start_end[1]);
   this.fill();
   this.closePath();
 }

 CanvasRenderingContext2D.prototype.strokePolygon = function(points) {
   xy = points.split(" ");
   this.beginPath();
   if(xy.length > 0) {
    // determine start end point
    start_end = xy[0].split(",");
    this.moveTo(start_end[0], start_end[1]);
   }
   // run through single points
   for( i=1;  i< xy.length; i++) {
     xyN = xy[i].split(",");
     this.lineTo(xyN[0], xyN[1]);
   }
   this.lineTo(start_end[0], start_end[1]);
   this.stroke();
   this.closePath();
 }
After the prototype has been extended, these new methods can be used with the Context object:
draw.js:
 let canvas = document.querySelector('#myCanvas');
 if (canvas.getContext) {
   let ctx = canvas.getContext("2d");
   ctx.fillStyle = "red";
   ctx.fillCircle(150, 150, 100);
   ctx.lineWidth = 3;
   ctx.strokeCircle(150, 150, 100);
   ctx.strokeCircle(30, 30, 20);
   ctx.strokeCircle(30, 270, 20);
   ctx.strokeCircle(270, 30, 20);
   ctx.strokeCircle(270, 270, 20);
   ctx.lineWidth = 1;
   ctx.strokeCircle(150, 150, 120);
   ctx.lineWidth = 3;
   ctx.fillStyle = "blue";
   ctx.fillPolygon(points = "150,280 270,100 30,100");
   ctx.strokePolygon(points = "150,280 270,100 30,100");
 }
2.6. Overview of ready-made <canvas> libraries
The selection of ready-made <canvas> libraries is impressive. Many of these ready-made APIs use only JavaScript, and you don't need an extension anymore. Canvas APIs exist for different purposes, for drawing shapes, graphs or animations. Of course, you can also write your own libraries.
Such libraries or frameworks package the functionalities so that they can be reused with a simpler syntax.
Of course there are a lot of more good APIs out there, but these should be enough to get you started.
3. Determine the location with the geolocation API
The Geolocation API can be used to determine the visitor's location, which works with almost everything modern web browsers. The browser can use several methods for this, such as the IP address, the WLAN connection, the cell tower the smartphone is connected to, and the position via GPS transmitter, as long as it is supported by the hardware. If a device contains a GPS transmitter, the geolocation API theoretically works offline as well.
How the determination works also depends on the device used. For a local desktop computer, which is not equipped with a GPS transmitter or a mobile modem, the accuracy of the position by IP address can vary quite a bit (depending on the provider). In a rural region, for example, the determination of the location with a mobile device is usually accurate to the meter.
Privacy and security
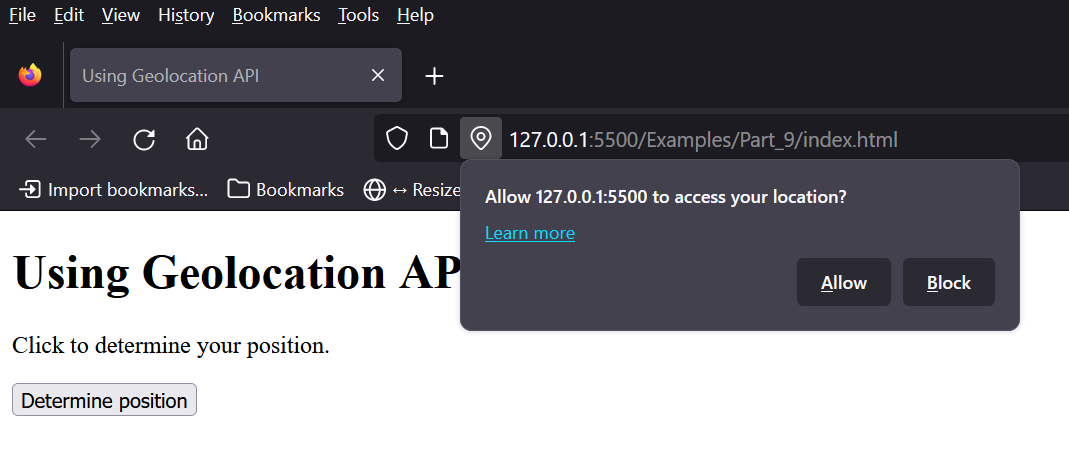
Determining the location of a user is quite easy nowadays. However, it is not possible to locate visitors to a website to the nearest meter. You can't get location data without the explicit consent of the visitor. In most web browsers there is a query. How the web browser stores this consent or refusal varies, but can be reversed at any time.
More information about the security rules and the Geolocation API can be found here W3C.
3.1. Using the Geolocation API in an HTML Document
To be able to use the Geolocation API, you must first check whether it is supported:
Complete Code - Examples/Part_9/...
 <body>
   <h1>Using Geolocation API</h1>
   <p>Click to determine your position.</p>
   <button onclick="getmyLocation()">Determine position</button>
   <p class="output"></p>
   <script src="script.js"></script>
 </body>
 let x = document.querySelector('.output');

 function getmyLocation() {
   if (navigator.geolocation) {
      navigator.geolocation.getCurrentPosition(showPosition);
   } else {
      x.innerHTML = "Your web browser does not support the Geolocation API!";
   }
 }

 function showPosition(position) {
   let pos = "Latitude: " + position.coords.latitude;
   pos += "<br>Longitude: " + position.coords.longitude;
   x.innerHTML = pos;
 }
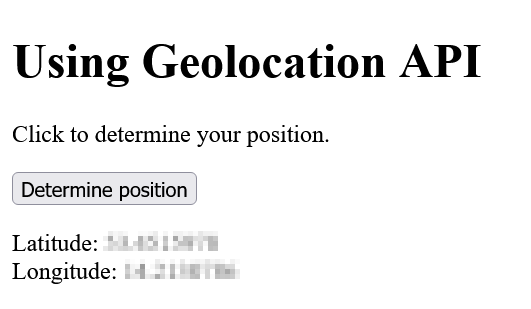
When the button is clicked, the function getMyLocation() is called, where first it is checked if navigator.geolocation is equal to true and thus the API can be used. Then the getCurrentPosition() method of the API starts. On first use, the user's consent should be obtained. If consent is given and the getCurrentPosition() method is executed successfully, a coordinate object is returned which is passed as a parameter to the callback function set up here with showPosition(). This coordinate object is used in the showPosition callback function to output the determined data (latitude, longitude).
There are more properties than coords.latitude and coords.longitude:
| Property | Description |
|---|---|
| coords.latidude | Geographic latitude |
| coords.longitude | Geographic longitude |
| coords.accuracy | Precision of width and length in meters |
| coords.altitude | Height in meters |
| coords.altitudeAccuracy | Precision of the height in meters |
| coords.heading | Direction |
| coords.speed | Speed |
| timestamp | Timestamp of the request |
3.2. Handle errors and access rights of the Geolocation API
If the Geolocation API is used, one should set up a function for errors, so that the user knows why a location detection did not work. The function only needs to be passed as the second parameter of the getCurrentPosition() method:
Complete Code - Examples/Part_10/...
 <body>
   <h1>Geolocation API - error handling</h1>
   <p>Click to determine your position.</p>
   <button onclick="getmyLocation()">Determine position</button>
   <p class="output"></p>
   <script src="script.js"></script>
 </body>
 let x = document.querySelector('.output');

 function getmyLocation() {
   if (navigator.geolocation) {
      navigator.geolocation.getCurrentPosition(showPosition, showError);
   } else {
      x.innerHTML = "Your web browser does not support the Geolocation API!";
   }
 }

 function showPosition(position) {
   let pos = "Latitude: " + position.coords.latitude;
   pos += "<br>Londitude: " + position.coords.longitude;
   x.innerHTML = pos;
 }

 function showError(error) {
   if (error.PERMISSION_DENIED) {
      x.innerHTML = "Access to your position has been denied!? Blocked?"
   } else if (error.POSITION_UNAVAILABLE) {
      x.innerHTML = "There are no geoposition data available"
   } else if (error.TIMEOUT) {
      x.innerHTML = "Timeout on location request was triggered."
   } else {
      x.innerHTML = "An unknown error has occurred";
   }
 }
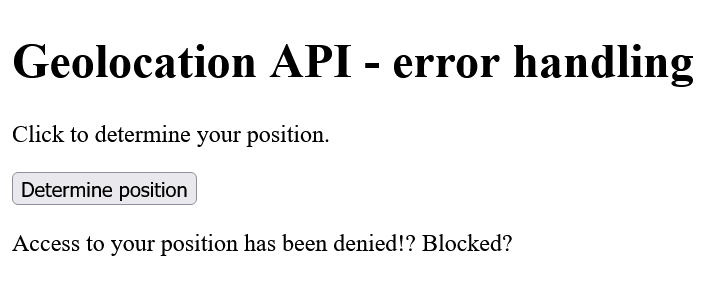
Depending on whether an error occurred and which error occurred, the result will be output on the website.
Possible errors and their meaning:
| Error | Meaning |
|---|---|
| PERMISSION_DENIED | Access denied. User has probably denied permission to determine position. |
| POSITION_UNAVAILABLE | The position could not be determined. |
| TIMEOUT | The query of the position took too long and could not be done within a certain time. |
3.3. Fine-tuning with further options of the Geolocation API
The method getCurrentPosition() can take a third optional parameter with an object of type PositionOptions:
Complete Code - Examples/Part_11/...
 <body>
   <h1>Geolocation API - fine tuning</h1>
   <p>Click to determine your position.</p>
   <button onclick="getmyLocation()">Determine position</button>
   <p class="output"></p>
   <script src="script.js"></script>
 </body>
 let x = document.querySelector('.output');

 function getmyLocation() {
   if (navigator.geolocation) {
      let geo_options = {
          enableHighAccuracy: true,
          maximumAge: 30000,
          timeout: 27000
      };
      navigator.geolocation.getCurrentPosition(showPosition, showError, geo_options);
   } else {
      x.innerHTML = "Your web browser does not support the Geolocation API!";
   }
 }
 ...
Here with enableHighAccuracy, maximumAge and timeout all three existing properties of the PositionOptions object are used.
| Property | Description |
|---|---|
| enableHighAccuracy | With true the API is forced to determine the position even more precisely. |
| maximumAge | This specifies how long a cached location data may be used the next time getCurrentPosition() is called. If 0 is specified, no cached data will be used, and the current position is always required. |
| timeout | This specifies a time in milliseconds after which an error (TIMEOUT) is to be triggered if no data could be retrieved by then. |
	 ...
 let geo_options = {
   enableHighAccuracy: true,
   maximumAge: 30000,
   timeout: 27000
 };
 ...
Here enableHighAccuracy: true was used to enable the highest possible location determination. If the last location was determined with getCurrentPosition() within 30 seconds, a cached location may be used, which was specified with maximumAge: 30000. If the location determination takes longer than 27 seconds, a timeout due to the timeout is returned as an error (timeout:27000).
3.4. Permanently monitor the position of the user
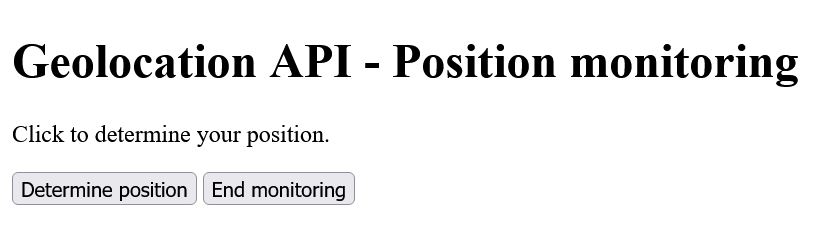
Permanent monitoring of the user's position is possible with the watchPosition() method, which has the same structure as getCurrentPosition(). The first parameter is a callback function which should be called on success to evaluate the position data. Optionally, a callback function can be set as the second parameter, which will be called in case of an error. Also optional can be used as parameter is the PositionObject object. In contrast to the method getCurrentPosition() the method watchPosition() calls the callback function every time the position of the user changes. Additionally, this method returns an ID that can be passed to the clearWatch() method as a parameter to stop the watchPosition() method again.
To better test the following example, a device with a GPS transmitter is required:
Complete Code - Examples/Part_12/...
 <body>
   <h1>Geolocation API - Position monitoring</h1>
   <p>Click to determine your position.</p>
   <button onclick="getmyLocation()">Determine position</button>
   <button onclick="endmyLocation()">End monitoring</button>
   <p class="output"></p>
   <script src="script.js"></script>
 </body>
 let x = document.querySelector('.output');
 let id;

 function getmyLocation() {
   if (navigator.geolocation) {
      let geo_options = {
          enableHighAccuracy: true,
          maximumAge: 30000,
          timeout: 27000
      };
      id = navigator.geolocation.watchPosition(showPosition, showError, geo_options);
   } else {
      x.innerHTML = "Your web browser does not support the Geolocation API!";
   }
 }

 function showPosition(position) {...}

 function showError(error) {...}

 function endmyLocation() {
   if (navigator.geolocation) {
      navigator.geolocation.clearWatch(id);
      x.innerHTML = "Position monitoring finished";
   } else {
      x.innerHTML = "The web browser does not support geolocation API!";
   }
 }
3.5. Displaying the user's position on a map
With the information about the geographical longitude and latitude, you have all the necessary data to display the location on a map. This requires an API for a map provider.
Unlike in the examples before, the callback function showPosition() has to be adapted to display the detected location in a map. In the following example, the showPositionGoogle() and showPositionBing() callback functions were used to display the location in the Google and Bing map:
Complete Code - Examples/Part_13/...
 ...
    <!-- For Google Maps -->
    <script src="http://maps.google.com/maps/api/js?sensor=true"></script>
    <!-- For Bing Maps -->
    <script type="text/javascript" src="http://ecn.dev.virtualearth.net/mapcontrol/mapcontrol.ashx?v=7.0"></script>
 </head>
 <body>
    <h1>Geolocation API - show position on map</h1>
    <p>Click to view your position on a map.</p>
    <p>
      <button onclick="getmyLocation('google')">Google-Map</button>
      <button onclick="getmyLocation('bing')">Bing-Map</button>
      <button onclick="endmyLocation()">End monitoring</button>
    </p>
    <div class="output"></div>
    <script src="script.js"></script>
 </body>
 let x = document.querySelector('.output');
 let id = null;
 let geo_options = {
   enableHighAccuracy: true,
   maximumAge: 30000,
   timeout: 27000
 };

 function getmyLocation(str) {
   if (navigator.geolocation) {
      if (id != null) {
          navigator.geolocation.clearWatch(id);
      }
      if (str == "google") {
          id = navigator.geolocation.watchPosition(
              showPositionGoogle, showError, geo_options);
      } else if (str == "bing") {
          id = navigator.geolocation.watchPosition(
              showPositionBing, showError, geo_options);
      }
   } else {
      x.innerHTML = "The web browser does not support geolocation API!";
   }
 }

 // Show position with Google Maps
 function showPositionGoogle(position) {
   let latlng = new google.maps.LatLng(
      position.coords.latitude,
      position.coords.longitude);
   let myOptions = {
      zoom: 12,
      center: latlng,
      mapTypeId: google.maps.MapTypeId.ROADMAP
   };
   let map = new google.maps.Map(x, myOptions);

   let marker = new google.maps.Marker({
      position: latlng,
      map: map,
      title: "Your position"
   });
 }
 // Show position withBing Maps
 function showPositionBing(position) {
   let latlng = new Microsoft.Maps.Location(position.coords.latitude, position.coords.longitude);
   let myOptions = {
      credentials: "AoDa4otH86aw2VF_Te1WpuxyGlI4-sUV3ZSIDxEWnGXAj62fmgvd2CZxFr82dqFE",
      center: latlng,
      mapTypeId: Microsoft.Maps.MapTypeId.road,
      zoom: 14
   };
   let map = new Microsoft.Maps.Map(x, myOptions);
 }
 ...
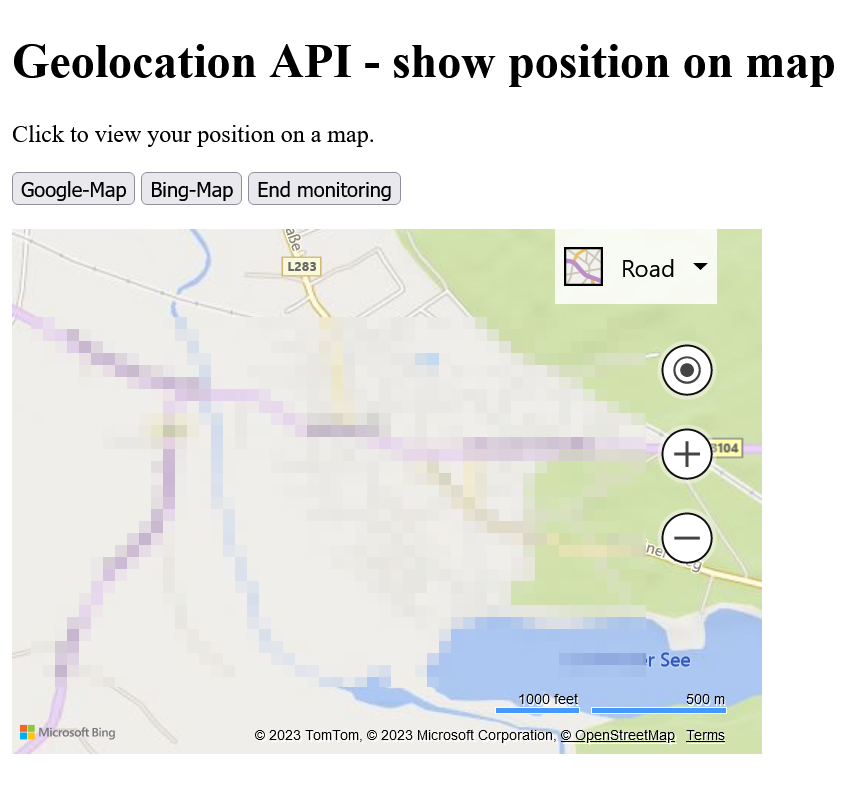
First, the Google Maps API and the Bing Maps AJAX Control were embedded. The size for the map is shown in the div- element. When a button is clicked, the function getMyLocation() determines which button was clicked after checking if the Geolocation API is available. This was realized here with the string google or bing, which is passed to the function getMyLocation(str) when clicking. Depending on which map is to be used, the watchPosition() method is passed the callback function showPositionGoogle() or showPositionBing() as the second parameter.
Apart from the properties determined with the geolocation API (position.coords.latitude and position.coords.longitude), the methods, objects and options contained in showPositionGoogle() and showPositionBing() are pure Google Maps API or Bing Maps AJAX Control specifications, which have nothing more to do with the geolocation API.
More information about the Google Maps API and Bing Maps AJAX Control:
sensor parameter on Google-Maps-API set to true or false?
In the example, the sensor parameter has been set to true (<script src="http://maps.google.com/maps/api/js?sensor=true"></script>) because it makes the positioning more accurate if the device contains a GPS transmitter. For a local computer, it can be set to false if there is no GPS transmitter.
4. Drag & Drop-API
Drag & Drop has been implemented over the years with libraries like JQuery, Dojo or MooTools to drag an object from one position to another in the web browser with the mouse button held down. With the Drag & Drop API, Drag & Drop native can be used without any further library. However, using the native Drag & Drop API is more complex than the solution with jQuery, Dojo or MooTools.
4.1. Making an HTML element draggable
To make an HTML element draggable, the HTML attribute draggable can be used. The attribute is passed either the value true or false. With true the HTML element is marked as draggable and with false not:
<img src="image.png" width="100" height="100" draggable="true">
Theoretically, draggable="true" can be omitted from the <img> element, because some HTML elements are already drawable by default like <img> or <a> with the href attribute.
4.2. Events that can occur during drag & drop
| JavaScript Event | Description |
|---|---|
| dragstart | Fired when the user starts dragging an HTML element with the mouse button held down. After the dragstart event, a function is usually called that takes care of the data associated with that element. |
| dragenter | Fired when the mouse makes the first move when dragging over an HTML element. This event is useful if something needs to be styled visually when the user starts dragging an HTML element. |
| dragover | The event is triggered when a draggable element stands over another element. |
| dragleave | The event is triggered when the dragged element leaves another HTML element. In practice, this event can be used to remove a visual highlight from a drop area. |
| drag | The event is fired whenever an HTML element is moved with the mouse button held down. |
| drop | The drop event is fired when an element is dropped over another element that was a valid drop target. Here, the usual response is to take care of the dropped data and insert it into the drop area. |
| dragend | This event is triggered when the drag & drop is finished. |
4.3. Start dragging elements
After setting an element with the draggable attribute to true to be able to drag it, an event handler can be set up for the dragstart event, where m will take care of the data that is being dragged:
<img src="image.png" width="100" height="100" draggable="true" ondragstart="dragHandle(event);" id="source1">
4.4 Handling the data for dragging
When the user starts dragging the image, the dragstart event is fired, and the dragHandle(event) event handler is called where the data to drag is specified. For this purpose, each drag event has a dataTransfer object that is used to manage the data to be dragged:
 ...
 function dragHandle(e) {
  ...
  e.dataTransfer.setData("text", e.target.id);
  e.dataTransfer.effectAllowed = "move";
 }
 ...
The setData() method is used to specify the data to be transported. The first parameter is used to specify the data to be transferred with "text", which corresponds to the MIME type "text/plain". Other MIME types can also be used for the type of the first parameter. The second parameter specifies the data itself. You can get to this data using the id. With effectAllowed a visual annotation can be added to the drag operation for the user (move). Besides the move value used here for a restriction to dragging, none, copy, copyLink, copyMove, link, linkMove, move and all can also be used. How the webbrowsr displays it depends on the browser.
Show own icon when dragging
The setDragImage() method of the dataTransfer object can be used to set a custom icon for dragging.
4.5. Set the place for dropping
The dragover event defines where an element can be dropped. By default, data or elements cannot be dropped on other elements. To allow dropping on an element, the default behavior of the element must be prevented. This is achieved by using event.preventDefault() to respond to the occurrence of the dragover event.
<div id="dropplace1" ondragover="event.preventDefault()"></div>h
An element can now be dropped onto this div element.
4.6. Process the dropped data
After preventing the default behavior of the dragover event, an event handler can be set up for the drop event when the element has been dropped. In the function where the drop event was handled, the dropped data can be taken care of right away.
<div id="dropplace1" ondrop="dropHanlde(event)" ondragover="event.preventDefault()"></div>
 function dropHandle(e) {
  e.preventDefault();
  let data = e.dataTransfer.getData("Text");
  let theDraggedElement = document.getElementById(data);
  e.target.appendChild(theDraggedElement);
 }
In the function dropHandle(e) a default behavior must be prevented again with e.preventDefault(), otherwise e.g. after dropping an element, if it is e.g. a link this would be opened in the web browser. With the getData() method of the dataTransfer object the dropped data can be retrieved based on the MIME type. In data you can only find the id of the dropped element at the moment, but with getElementById() the complete HTML element is fetched to this ìd and passed with appendChild() as a new child element inside the drop area.
4.7. Handle other events during the drag and drop process
Additional visual cues or information for the user can be presented with the dragenter, dragleave and dragend events:
 ...
 document.addEventListener("dragenter", function(event) {
   let theData = event.dataTransfer.getData("Text");
   let theDraggedElement = document.getElementById(theData);
   theDraggedElement.style.opacity = 0.0;
 }, false);

document.addEventListener("dragend", function(event) {
   event.target.style.opacity = "";
 }, false);
 ...
Here, once the dragenter event has occurred, the original location of the dragged HTML element is displayed as invisible (opacity = 0.0). As soon as this action is finished and the dragenter event is fired, the element will be displayed completely visible again. The third parameter of addEventListener() is used to determine if and in which order the event will rise. A boolean parameter is expected as value. By default false is mostly used here, which calls the event handler of the element first and then the event handlers of the parent elements. With true it is the other way around.
The complete example in the overview
Complete Code - Examples/Part_14/...
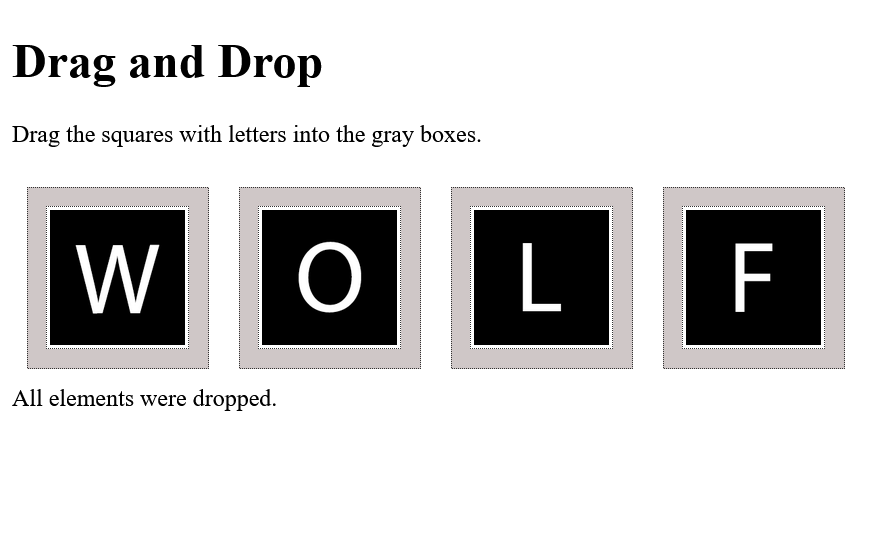
  <h1>Drag and Drop</h1>
  <p>Drag the squares with letters into the gray boxes.</p>
  <div id="drag-elements">
      <img src="images/F.png" width="80" height="80" draggable="true" ondragstart="dragHandle(event);" id="source1" alt="Letter-F">
      <img src="images/L.png" width="80" height="80" draggable="true" ondragstart="dragHandle(event);" id="source2" alt="Letter-L">
      <img src="images/O.png" width="80" height="80" draggable="true" ondragstart="dragHandle(event);" id="source3" alt="Letter-O">
      <img src="images/W.png" width="80" height="80" draggable="true" ondragstart="dragHandle(event);" id="source4" alt="Letter-W">
  </div>
  <div id="drop-elements">
      <div id="dropplace1" ondrop="dropHandle(event);" ondragover="dragoverHandle(event);" ondragleave="dragleaveHandle(event);">
      </div>
      <div id="dropplace2" ondrop="dropHandle(event);" ondragover="dragoverHandle(event);" ondragleave="dragleaveHandle(event);">
      </div>
      <div id="dropplace3" ondrop="dropHandle(event);" ondragover="dragoverHandle(event);" ondragleave="dragleaveHandle(event);">
      </div>
      <div id="dropplace4" ondrop="dropHandle(event);" ondragover="dragoverHandle(event);" ondragleave="dragleaveHandle(event);">
      </div>
  </div>
  <!-- Output of information -->
  <div id="log-dnd" style="clear: both;"></div>
  <script src="dnd.js"></script>
 // Output of information
 let log = document.getElementById("log-dnd");
 let counter = 0;
 const maxPictures = 4;

 // Called when 'drag' was started
 function dragHandle(e) {
   log.innerHTML = "An element is drawn."
      // What to 'pull
   e.dataTransfer.setData("Text", e.target.id);
   e.dataTransfer.effectAllowed = 'move';
   // Own icon that is displayed when dragging
   let dragIcon = document.createElement('img');
   dragIcon.src = "images/logo.png";
   dragIcon.widh = 50;
   e.dataTransfer.setDragImage(dragIcon, -5, -5);
 }

 // Function is called at 'drop'
 function dropHandle(e) {
   if (!e.target.hasChildNodes()) {
      log.innerHTML = "Operation canceled: There is already an element here.";
      e.preventDefault();
      return false;
   }
   // A reference to the 'drag' element
   let data = e.dataTransfer.getData("Text");
   // Get the element
   let draggedElement = document.getElementById(data);

   // log.innerHTML = data + "/" + e.target.id;
   console.log(data + "/" + e.target.id);

   // Add the element to the drop element
   e.target.appendChild(draggedElement);
   // Allow the browser to 'drop'
   e.preventDefault();
   counter++;
   if (counter == maxPictures) {
      log.innerHTML = "All elements were dropped."
   } else {
      log.innerHTML = "Element " + counter + " from " + maxPictures +
          " was dropped."
   }
 }

 // Function is called with dragged element over the target
 function dragoverHandle(e) {
   e.preventDefault();
   if (!e.target.hasChildNodes()) {
      log.innerHTML = "Here already lies an element.";
   } else {
      log.innerHTML = "You can drop the element here.";
   }
 }

 // Function is called when the dragged
 // Element has left the target area again
 function dragleaveHandle(e) {
   e.preventDefault();
   log.innerHTML = "Target area was left again";
 }

 document.addEventListener("dragenter", function(event) {
   let theData = event.dataTransfer.getData("Text");
   let theDraggedElement = document.getElementById(theData);
   theDraggedElement.style.opacity = 0.0;
 }, false);

 document.addEventListener("dragend", function(event) {
   event.target.style.opacity = "";
 }, false);

4.8. Further notes on Drag & Drop API
Dragging elements outside the web browser is no longer possible with dataTransfer.getData(). However, this data is then contained in the files property of dataTransfer. To realize this data transfer e.g. for an upload of data via drag & drop, a detailed knowledge about the File API is necessary. More information can be found here W3C.
5. Web Storage - Databases for offline applications
The Web Storage can store data locally in the user's web browser and read it out again. No database is created for storing the data; instead, simple key-value pairs are stored. The data is stored either without a fixed duration (Local Storage) or for the duration of a session (Session Storage). Local Storage and Session Storage are usually integrated into the web browser as alternatives to Cookies. This allows data to be stored, changed or deleted when the user is not online. Web Storage supports two types of objects, localStorage and , to store data in the web browser. Both objects have the same methods and properties, but differ in the duration of validity.
| Local Storage | Session Storage | Cookies | |
|---|---|---|---|
| Storage Size | 5 - 10 MB | 5 - 10 MB | 4 KB |
| Lifetime | Unlimited | Close page | Unlimited/Limited |
| Validity Range | All browser windows/tabs | A single browser window/tab | All browser windows/tabs per domain |
| Delete | From JavaScript or when the browser cache is emptied | Automatically when the browser window is closed | Durability is set when a cookie is created |
Whether the browser supports localStorage and sessionStorage can be checked this way:
 if (typeof(Storage) !== "undefined") {
  // Web Storage is supported.
 } else {
  // The web browser is not capable of web storage.
 }
The typeof operator can perform type checking. The support of web storage in the modern web browsers is quite good.
Common methods used for seating, reading and deleting data in the web browser with localStorage and sessionStorage:
| Method | Description |
|---|---|
| setItem(key, value); | Stores a key-value pair as an element in the localStorage or sessionStorage object. |
| getItem(key); | This reads the value (value) from the key of the localStorage or sessionStorage object and returns it. |
| removeItem(key); | Deletes the key-value pair entry with the key key from the localStorage or sessionStorage object |
| clear(); | Clears the memory in the web browser. |
The values of the types can actually be arbitrary, but are all stored as string. If numeric values were stored, the numbers must be converted again after reading, with integers with let a = parseInt(String) or with floating point numbers with let b = parseFloat(String).
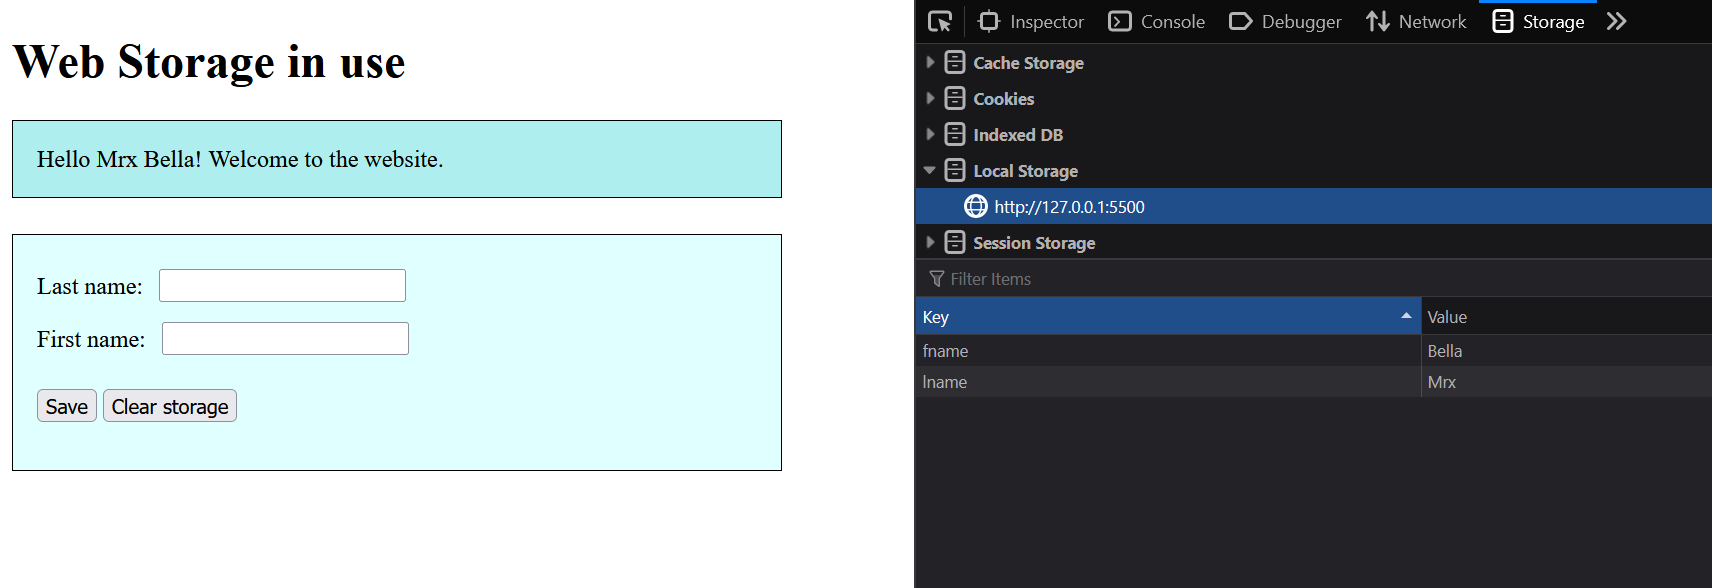
The use of localStorage:
Complete Code - Examples/Part_15/...
  <h1>Web Storage in use</h1>
  <div class="loadData"></div>
  <form class="form">
      Last name: <input type="text" id="val1" value="">
      <br>
      First name: <input type="text" id="val2" value="">
      <p>
          <button onclick="saveValue()">Save</button>
          <button onclick="clearStorage()">Clear storage</button>
      </p>
  </form>
  <script src="script.js"></script>
 if (typeof(Storage) != "undefined") {
   let lname = localStorage.getItem("lname");
   let fname = localStorage.getItem("fname");
   if (lname == null) { lname = "User"; }
   if (fname == null) { fname = ""; }
   document.querySelector('.loadData').innerHTML += "Hello " +
      lname + " " + fname + "! Welcome to the website.";
 } else {
   document.querySelector('.loadData').innerHTML = "Your web browser does not support web storage!";
 }

 function saveValue() {
   if (typeof(Storage) != "undefined") {
      window.localStorage.setItem('lname', document.querySelector('#val1').value);
      window.localStorage.setItem('fname', document.querySelector('#val2').value);
   } else {
      alert("Your web browser does not support Web Storage!")
   }
 }

 function clearStorage() {
   window.localStorage.clear();
   //window.localStorage.removeItem("lname");
   //window.localStorage.removeItem("fname");
 }
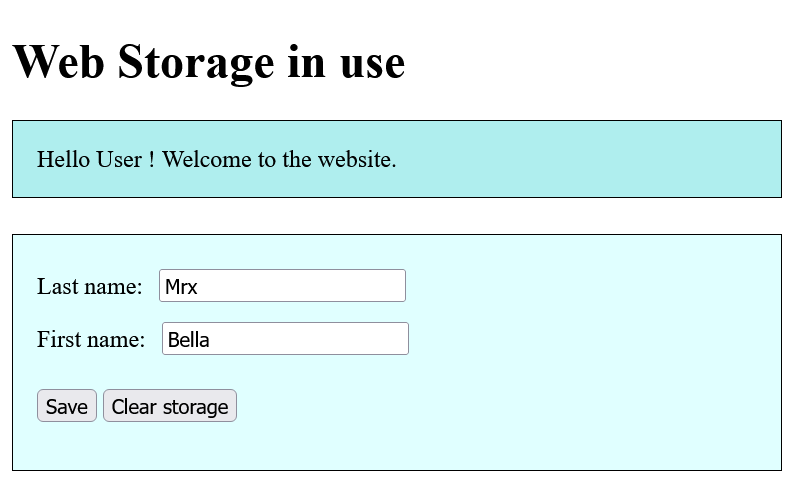
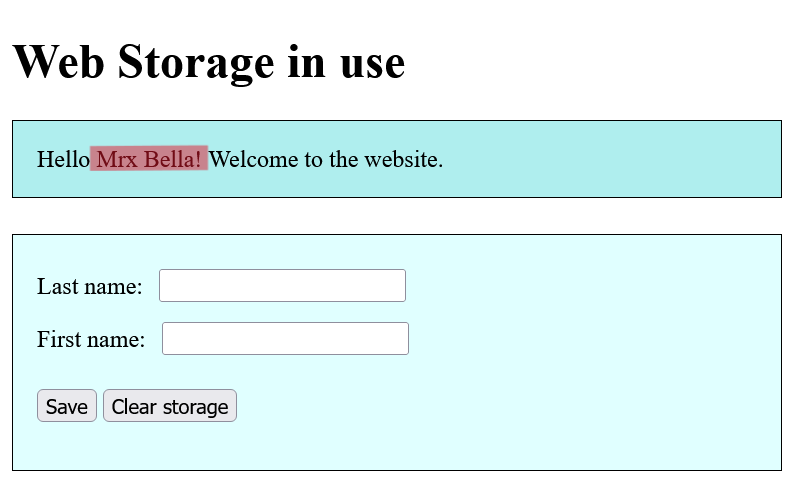
In this example, a name can be entered that can be permanently saved in the web browser. That the data has been saved can be recognized by the greeting on the web page, even offline or the web browser is closed and reopened.
Current state of Local Storage in Firefox developer tool:
If the data should not be stored permanently but only temporarily, then only localStorage must be replaced by sessionStorage.
5.1. Realize cookies with JavaScript
Cookies are text information that is stored locally in the web browser when a website or a specific action is called up. As information, data is often stored to recognize the user on a return visit. Cookies are also used to analyze surfing behavior, and also when several steps are performed on a website(e.g. adding a product to the shopping cart). Since cookies can only be 4,096 bytes in size, the amount of data that can be stored is limited. But it is possible to create multiple cookies per domain. The RFC standard (RFC 6265) specifies at least 50 cookies per domain. Many web browsers allow more.
To create a cookie, there is the property document.cookie:
	 document.cookie = "user=Bella Mrx";  // Cookie set
 console.log(document.cookie);        // Cookie output
 let myCookie = document.cookie;      // Read out cookie
In this example a Session cookie was created because no specified time was given for the cookie to expire. Session cookies expire as soon as the active browser window is closed, this is useful when a login is finished as soon as the browser window is closed.
Session Cookie with expiration time:
document.cookie = "user=Bella Mrx; expires=Sun, 6 Oct 2023 18:00:00 UTC";
This cookie will be deleted on October 6, 2023 at 6 pm.
It is also possible to create multiple cookies for a website:
 document.cookie = "user=Bella Mrx; expires=Sun, 6 Oct 2023 18:00:00 UTC";
 document.cookie = "trackID=123456e789; path=/";
Here two cookies were created. The path attribute specifies the path to which web page the cookie belongs. The first cookie named user is a cookie with expiration date, and the second cookie trackID is a session cookie.
Besides the name-value pair for the actual data, the expiration date and the path of the cookie, there are a few more properties that can be used with a cookie:
| Values | Description |
|---|---|
| Key Value Pair | This is the most important entry in the cookie with the actual information. The name is case sensitive. This entry must be present in the cookie, all others are optional. |
| Domain and Path | Here you specify the domain of the server and the path on the server from which the cookie should be sent. |
| Expiration Date | This specifies the date on which the cookie should be automatically deleted and thus no longer sent to the server. If no expiration date is used it is a session cookie. |
| Secure, HttpOnly | Secure specifies whether a cookie should only be sent with secure SSL connections (https) to prevent sending via http. HttpOnly, on the other hand, can be used to prevent the cookie from being accessed via JavaScript. |
Example:
Complete Code - Examples/Part_16/...
  <h1>Cookies in use</h1>
  <div class="loadData"></div>
  <form class="form">
      Last name: <input type="text" id="val1" value="">
      <br>
      First name: <input type="text" id="val2" value="">
      <br><br> <input type="checkbox" id="cookie4ever"> Save cookie permanently
      <p>
          <button onclick="setCookie()">Set cookie</button>
      </p>
  </form>
  <script src="script.js"></script>
 let user = getCookie("user"); // Is a cookie already set?
 let welcome = user ? user : "User";
 document.querySelector('.loadData').innerHTML += "Hello " +
   welcome + "! Welcome to the website.";

 // How long should the cookie be stored (days)?
 const expires_cookie = 2;
 const path = ";path=/";

 function setCookie() {
   let lname = document.querySelector('#val1').value;
   let fname = document.querySelector('#val2').value;
   if (!(lname || fname)) {
      alert("Error: Empty name fields")
      return null;
   }
   let saveCookie = document.querySelector('#cookie4ever').checked;
   let expires = "";
   if (saveCookie) {
      let date = new Date();
      date.setTime(date.getTime() + (expires_cookie * 24 * 60 * 60 * 1000));
      expires = "; expires=" + date.toUTCString();
   }
   document.cookie = "user=" + fname + " " + lname + expires + path;
 }

 function getCookie(cname) {
   let _cname = cname + "=";
   let cookieData = document.cookie.split(";");
   for (let i = 0; i < cookieData.length; i++) {
      let c = cookieData[i];
      while (c.charAt(0) == ' ')
          c = c.substring(1, c.length);
      if (c.indexOf(_cname) == 0)
          return c.substring(_cname.length, c.length);
   }
   return null;
 }
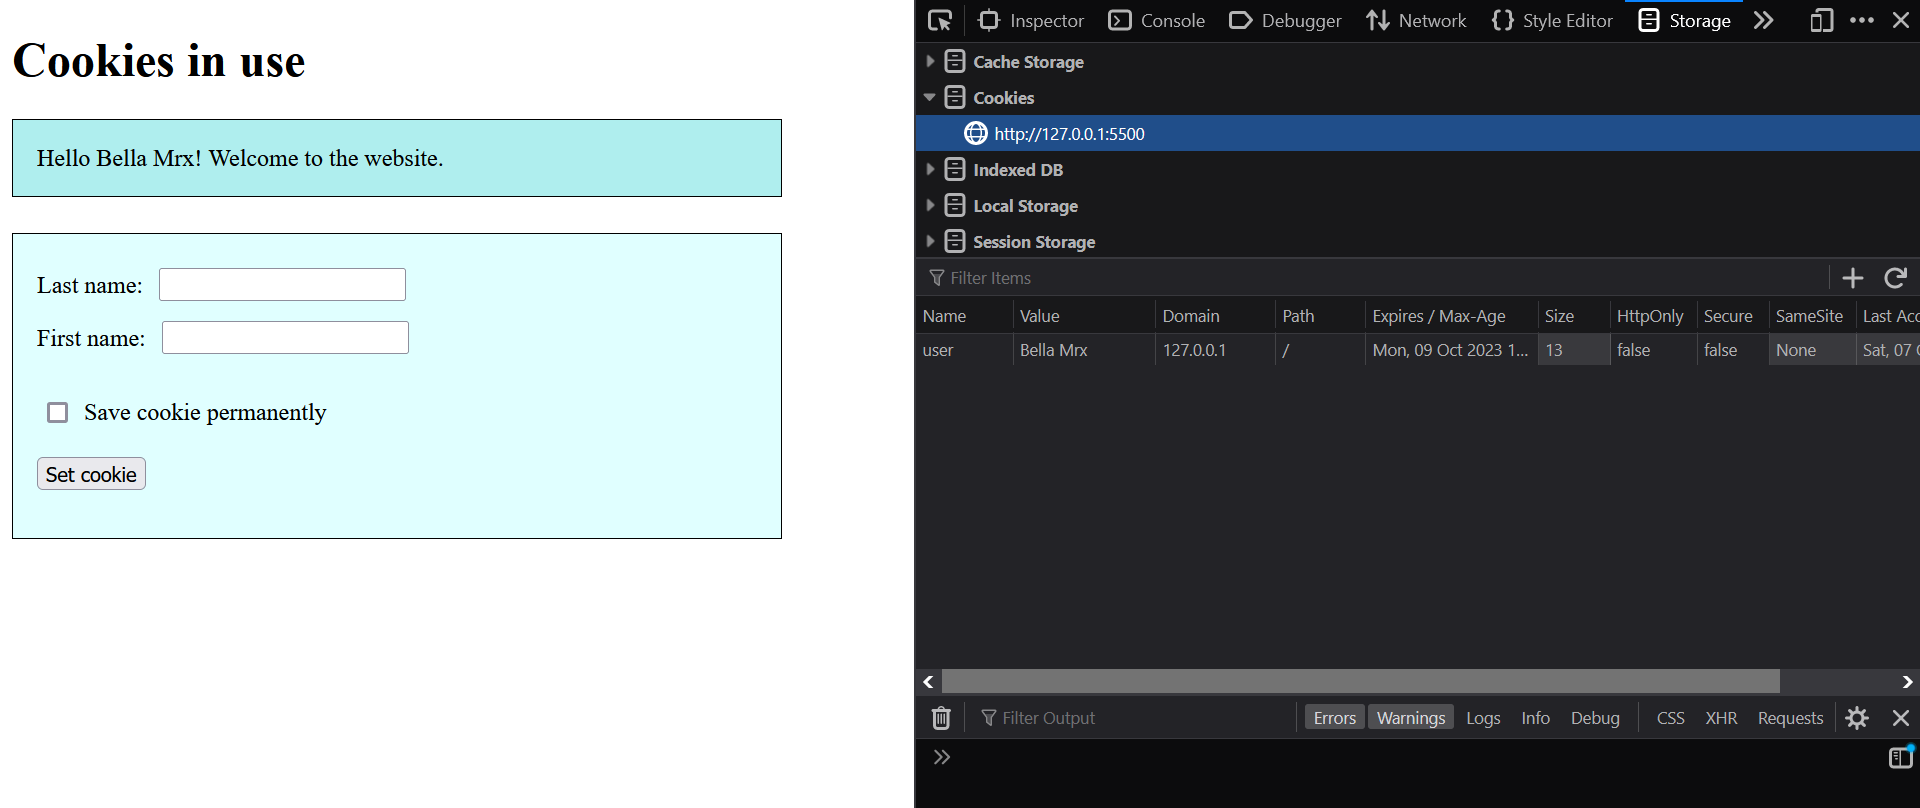
First it is checked whether a cookie is already set for the web page. It is then read out with getCookie() if necessary, in order to use the name in the welcome text. The function setCookie() is executed when the corresponding button is clicked. Here the first name and the last name are used as value for the key user.
Delete a cookie with JavaScript
To delete a cookie with JavaScript, simply set the expiration date to a date in the past.
5.2. Cookies vs. Web Storage
Cookies are suitable for storing only a small amount of information. With web storage, more memory can be used. It is possible to set multiple cookies, but the disadvantage is that the effort to set and read cookies is much more complex. For fast and frequent storing and querying, the Web Storage is more suitable. Another difference is that the information in the cookie is also sent to the server with each request to the server. Web Storage, on the other hand, is only used locally in the web browser. Here it must be considered whether this is also needed. On the one hand, it affects the traffic and on the other hand, data is transferred unencrypted in the HTTP protocol, if the HTTPS protocol is not or cannot be used, this also represents a security risk.
5.3. More offline technologies
Besides Local Storage, Session Storage and Cookies there are two more offline technologies. These are Web SQL and IndexedDB.
The Web SQL database corresponds in scope and structure to a real relatinal SQL database. The purpose is to integrate a SQLite based database into the web browser and perform the SQL queries via JavaScript. Although some web browsers still support this technology, it could disappear from web browsers at any time, and therefore it is not really useful to deal with it in practice.
This leaves only IndexedDB, which are indexed databases. IndexedDB also uses a simple key-value mapping of the data and handles indexing like a relational database, and it can also store other data types and not just strings. More information about Indexed Database API here.
File API
The File API is not really an offline application, but with it it is possible to read local files with JavaScript. But with this it is not possible to access arbitrary local files, but only files which are read in e.g. by the user with a form with <input type="file">.
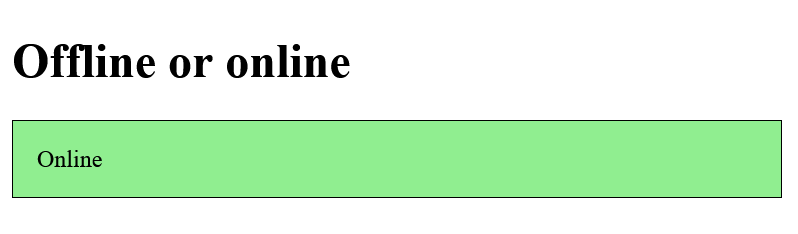
5.4. Check the user's Internet connection
Whether the user is currently online or offline can be checked with the navigator.onLine property. If the value is false, the user is offline, and if the value is true, the user is online (the state cannot always be determined 100% reliably). When the property navigator.onLine changes its state, the events online (true) or offline (false) are fired. To check the state, addEventListener() must listen for the online or offline events and respond accordingly with an event handler.
Example:
Complete Code - Examples/Part_17/...
 <body>
   <h1>Offline or online</h1>
   <div class="online">Online</div>
   <script src="script.js"></script>
 </body>
 function offon() {
   if (!navigator.onLine) {
      document.querySelector('.loadData').innerHTML = "Offline";
      document.querySelector('.loadData').className = "offline";
   } else {
      document.querySelector('.loadData').innerHTML = "Online";
      document.querySelector('.loadData').className = "online";
   }
 }

 window.onload = function() {
   if (document.addEventListener) {
      window.addEventListener("online", offon, false);
      window.addEventListener("offline", offon, false);
   }
   offon();
 }
6. Web Workers
Using web APIs often also means intensive use of JavaScript. The computational power of JavaScript can be high, despite everything it remains a simple single thread programming. If larger amounts of data are queried via an API and the DOM is manipulated at the same time, this can delay the loading time of a web page, or simply throw up an error message.
Single-Threading und Multi-Threading
A single-threaded program can only be executed in one piece and cannot be broken down into several small tasks. Multi-threading is when you want to split a program into several jobs or threads and then run them in parallel within the program. A real parallel execution becomes possible with several processor cores.
For the Web APIs, you have a tool in the form of Web Workers to run more intensive and longer JavaScript tasks in the background so that the user doesn't notice anything.
Example:
Complete Code - Examples/Part_18/...
 <body onload="startTimer()">
   <h1>Web Worker in use</h1>
   <div id="worker_1"></div>
   <div id="worker_2">Waiting for work ...</div>
   <button onclick="startWork()">Start intensive calculation</button>
   <script src="idle.js"></script>
 </body>
 function startTimer() {
   setInterval(function() { document.querySelector('#worker_1').innerHTML = Date.now(); }, 1);
 }

 function startWork() {
   var out = document.querySelector('#worker_2');
   out.innerHTML = "Calculation is performed ...";
   out.className = "calc";

   // 70 million x loop 500 times
   for (var i = 0; i < 70000000; i++) {
      for (var j = 0; j < 500; j++) {
          // just wasting time
      }
   }
   out.innerHTML = "Finished with the calculation!";
   out.className = "done";
 }

In the example, a simple timer runs in the web browser, returning a time in miliseconds that has passed since 01/01/1970 at 00:00:00 UTC. The timer is continuously updated every millisecond using setInterval(). This is demanding on the web browser, but it should be manageable. Only when the Start intensive calculation button is clicked, the startWork() function is started, and here the script blocks the web browser. On the one hand the running timer is stopped or blocked. Also the status message Calculation is performed ... and the class assignment with CSS are not used. The intensive calculation is only simulated with a loop (700 million x 500), so that the web browser comes to its limits (if not then simply increase the values step by step). Some web browsers give a known error message that the web page is no longer responding, and a query is made whether the page should continue to run or not. This blocking of the web browser can not be done to the user, and for such cases there is Web Workers.
Whether the web browser can handle web workers can be tested if the object 'Worker' is undefined:
 if (typeof(Worker) == "undefined") {
     // The web browser does not support web worker ...
 } else {
     // The web browser knows Web Workers.
   }
If the web browser can handle Web Workers, a Web Workers object can be created. This Web Worker does the work in the background without blocking the user interface or preventing other scripts from working. This code must therefore be stored in a separate script.
 ...
 let w = undefined;
 ...
 if (w === undefined) {
   w = new Worker("work.js");
 }
 ...
Here it is first checked whether the Web Worker does not already exist, before a new worker object can be created with new, which downloads the JavaScript file asynchronously, reads it in and is then ready for execution.
A Web Worker has certain limitations and communication between the Web Worker and the Web Browser is done via messages. With the method postMessage() you can send single messages to the Worker and also send messages from the Web Worker.
postMessage("One message");
The message exchange can be done as a usual string. Newer web browsers can also handle passing data in the form of a JSON object.
Listening to this message can be done in practice with an event listener onmessage:
 w.onmessage = function(event) {
   console.log("The message is: " + event.data);
 }
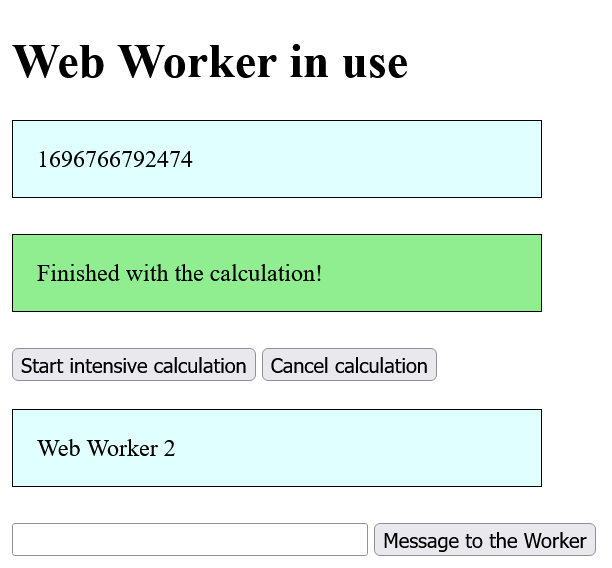
Now here is the complete example with Web Workers:
Complete Code - Examples/Part_19/...
  <h1>Web Worker in use</h1>
  <div id="worker_1"></div>
  <div id="worker_2">Web Worker 1: Waiting for work ...</div>
  <button onclick="startWork()">Start intensive calculation</button>
  <button onclick="stopWork()">Cancel calculation</button><br><br>
  <div id="worker_3">Web Worker 2</div>
  <input type="text" id="msg" size="30">
  <button onclick="heyWorker()">Message to the Worker</button>
  <script src="scripts/webworker.js"></script>
webworker.js:
 let w;
 let out = document.querySelector('#worker_2');

 function startTimer() {
   setInterval(function() { document.querySelector('#worker_1').innerHTML = Date.now(); }, 1);
 }

 function startWork() {
   if (typeof(Worker) == "undefined") {
      out.innerHTML = "Your web browser does not support web workers!";
   } else {
      out.innerHTML = "Calculation is performed ...";
      out.className = "calc";
      if (w == undefined) {
          w = new Worker("scripts/work.js");
      }
      w.onmessage = function(event) {
          out.innerHTML = event.data;
          out.className = "done";
      }
      w.onerror = function(event) {
          out.innerHTML = event.message;
          out.className = "quit";
      }
   }
 }

 function stopWork() {
   if (w != undefined) {
      w.terminate();
      w = undefined;
      out.innerHTML = "Calculation was aborted prematurely!";
      out.className = "quit";
   }
 }

 function heyWorker() {
   let out2 = document.querySelector('#worker_3');
   let w2;
   if (w2 == undefined) {
      w2 = new Worker("scripts/work2.js");
   }
   w2.onmessage = function(event) {
      out2.innerHTML = event.data;
      out2.className = "done";
   }
   w2.onerror = function(event) {
      out2.innerHTML = event.message;
      out2.className = "quit";
   }
   w2.postMessage(document.querySelector('#msg').value);
 }
When the Start intensive calculation button is clicked, the timer continues to run and the status message is also changed to Calculation is performed .... The loop run is executed in the background using a web worker and the work.js script. Immediately after the web worker is started using the work.js script, an event listener can be created using w.onmessage to wait for a message from the web worker.
work.js:
 for (let i = 0; i < 70000000; i++) {
   for (let j = 0; j < 50; j++) {
      // just wasting time
   }
 }
 postMessage("Finished with the calculation!");
In addition, the function stopWork() has been added, which makes it possible to terminate the Web Worker prematurely with the script work.js. An early termination can be achieved with the terminate() method via the main document. If the Web Worker is to be terminated within the Worker itself, the self.close() method can be used. To be able to use the worker again it was set to undefined after termination. There is also a second script work2.js that can be executed at any time, even if the other worker with the script work.js is already running. This worker demonstrates how to send a message to the worker with postMessage() and to listen to this message in the worker with the script work2.js. The specification of self is a reference to the global web worker object itself:
work2.js:
 self.onmessage = function(event) {
   let msg = "Message received:" + event.data;
   postMessage(msg);
 }
A web worker cannot access all functions because of the problems that could occur when using multiple threads. It is not possible to access the DOM directly. If the DOM is to be accessed, a message must be sent to the parent document with the Web Worker, and the message must be evaluated. There is no access with the Web Workers to:
- the DOM tree
- the window object
- the document object
- the parent object
These options are available with Web Workers:
- postMessage() to send and listen to incoming messages
- close() to terminate the current Web Worker
- self as reference to the global Web Workers object itself
- creating additional Web Workers
- import external scripts with importScripts('script.js')
- the XMLHttpRequest object for Ajax requests
- timers like setInterval(), setTimeout(), clearInterval() and clearTimeout()
- the navigator object
- the location object with the URL of the script executed by the Web Worker
Web Workers are only used for CPU intensive work. When an intensive image manipulation or image storage(canvas), an analysis of video files, spell checks, translations or a large database update.
More information about Web Workers can be found here HTML Living Standard.
7. Update without requests with server sent events
Server Sent Events (SSE) can be used to ensure that a website automatically receives an update from the server without having to make an explicit request. The communication takes place via messages. Examples of this are real-time transmissions of stock market prices, live updates from Facebook or X(Twitter), any live monitoring of statistics and live data of all kinds, news feed, updates of prices or sports results(liveticker). This technology is real server push technology, where the web browser keeps open a unidirectional HTTP connection to the server.
Whether the web browser masters SSE can be checked in this way:
 if (typeof(EventSource) !== "undefined") {
   // SSE are supported
 } else {
   // SSE are not supported
 }
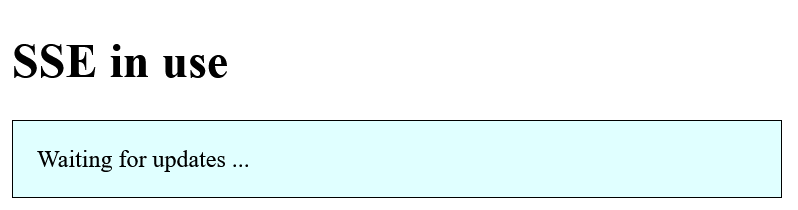
Example:
Complete Code - Examples/Part_20/...
  <h1>SSE in use</h1>
  <div id="output">Waiting for updates ...</div>
  <script src="script.js"></script>
 let out = document.querySelector('#output');

 if (typeof(EventSource) !== "undefined") {
   let sse = new EventSource("sse.php");
   sse.onmessage = function(event) {
      out.innerHTML = "Message: " + event.data;
      /*var dat = JSON.parse(event.data);
      out.innerHTML = dat.msg + ": " + dat.time + " - " + dat.val;*/
   }
 } else {
   out.innerHTML = "Your web browser cannot handle server-sent events.";
 }
The PHP script was passed along with the EventSource object:
sse.php:
 <?php
 header('Content-Type: text/event-stream');
 header('Cache-Control: no-cache');

 $time = time();
 $val = mt_rand(100, 999);

 /*echo "data: {\n";
 echo "data: \"msg\": \"New update is there\" ,  \n";
 echo "data: \"time\": \"$time\", \n";
 echo "data: \"val\": $val\n";
 echo "data: }\n\n";*/

 echo "retry: 15000\n"; // every 15 seconds
 echo "data: ($val) New update is there {$time}\n\n";
 flush();
 ?>
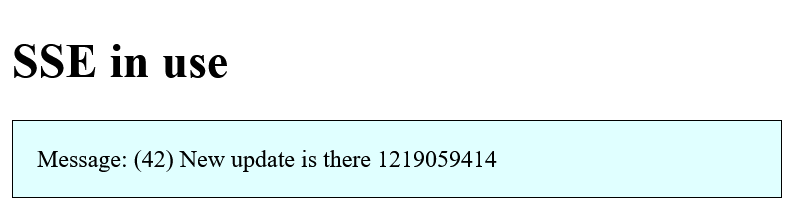
In this example nothing else is done than every 15 seconds a random number and a time stamp is sent as a message to the web page, where with onmessage waits for the message and evaluates it.
8. More Web-APIs
New web APIs are added all the time, so it is impossible to cover them all.
8.1. Real-time communication with the WebSockets
With WebSockets it is possible to create a real time based web application using a directional communication of the TCP connection. The connection is between a server and the client(the web browser).
WebSockets can be used wherever low latency is required between the server and the client. Is suitable for:
- Chat applications
- Online games with multiple players
- Financial applications
- live tickers
- real-time broadcasting of social streams
- any monitoring of websites or other applications on the web
More information about WebSockets can be found here DEV.
8.2. Voice and video telephony with WebRTC
WebRTC (Web Real Time Communication) is an open source standard for real-time communication like voice and video telephony and can be used natively in the web browser without extensions like plug-ins or add-ons. The encrypted video and audio stream can be transmitted directly from web browser to web browser (peer-to-peer) and does not require a streaming server in between.
More information about WebSockets can be found here:
8.3. 3D graphics and games with WebGL
With WebGL you can display hardware accelerated 3D graphics in the web browser without extensions. WebGL is based on OpenGL ES and was developed on the basis of JavaScript as a license-free standard.
More information about WebGL can be found here:
8.4. File API and local files
The File API can be used when dealing with local files. As interface for accessing local files there is File for read-only information of a single file, FileList for a whole list of File objects and Blob for setting a file in byte ranges. In order to be able to read the data structure of File, FileList or Blob asynchronously, as is typical for JavaScript, there is an additional interface with FileReader.
Using <input type="file" multiple>, multiple files can be selected, of which individual information such as the file name, file type and file size are subsequently to be output using FileList.
Example:
Complete Code - Examples/Part_21/...
  <h1>File API in use</h1>
  <p>Select file(s):
      <input type="file" id="myfiles" name="myfiles" multiple="">
  </p>
  <p class="output"></p>
  <script src="script.js"></script>
 if (window.FileReader && window.FileList) {
   let myfiles = document.querySelector('#myfiles');
   let output = "Your selected files:<br>";
   myfiles.onchange = function(event) {
      let flist = event.target.files;
      for (let i = 0; flist[i] != null; i++) {
          output += flist[i].name + ": " +
              "(" + flist[i].type + ") " +
              flist[i].size + " Bytes<br>";
      }
      document.querySelector('.output').innerHTML = output;
   }
 } else {
   console.log("Your web browser does not support the File API.");
 }
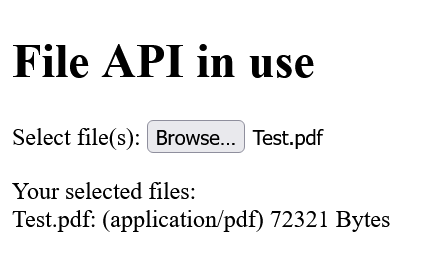
In myfiles a list of selected files, which were selected in the form and can be retrieved via event.target-files is stored. The myfiles object is a FileList type object. name, type or size are properties provided by the interface of the FileList object.
If the contents of the files are to be read in and output instead of the information, the interface of the FileReader object must be used.
Example:
Complete Code - Examples/Part_22/...
 if (window.FileReader && window.FileList) {
   let myfiles = document.querySelector('#myfiles');
   let output = document.querySelector('.output');
   myfiles.onchange = function(event) {
      let flist = event.target.files;
      for (let i = 0; flist[i] != null; i++) {
          if (flist[i].type.match("image.*")) {
              let fread = new FileReader();
              fread.onload = (function(file) {
                  return function(event) {
                      let elem = document.createElement("p");
                      let img = document.createElement("img");
                      img.setAttribute("src", event.target.result);
                      img.setAttribute("height", 100);
                      elem.appendChild(img);
                      output.appendChild(elem);
                  };
              })(flist[i]);
              fread.readAsDataURL(flist[i]);
          }
      }
   }
 } else {
   alert("Your web browser does not support the File API.");
 }
Overview of all web APIs
An overview of the individual APIs and their status can be found here APIsList.